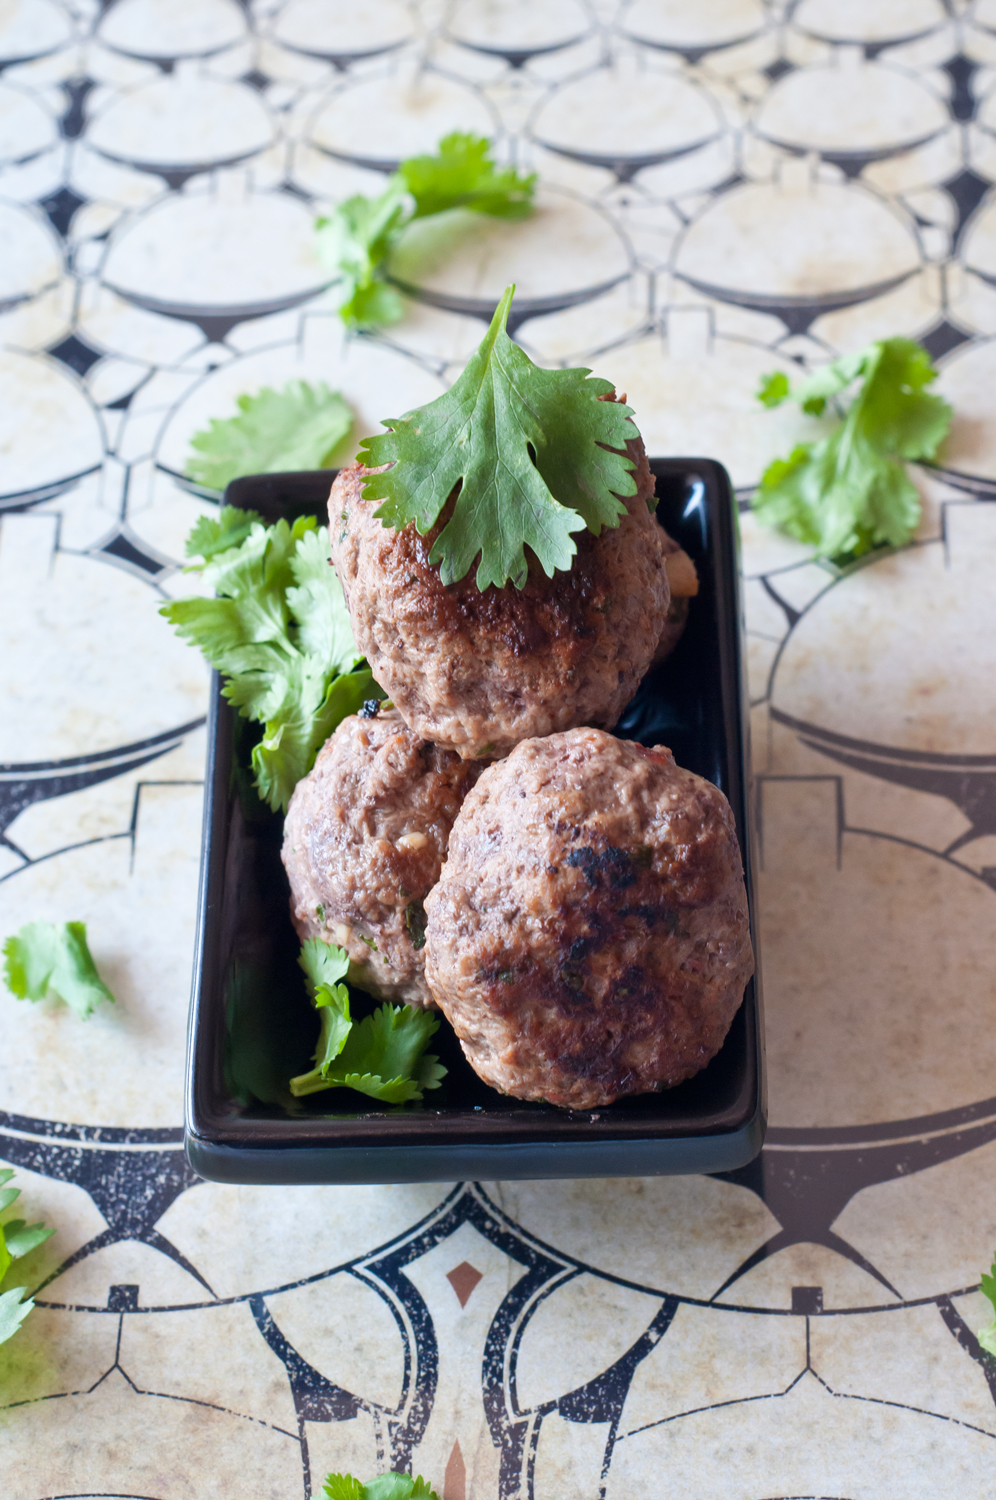
I’m glad I kept those aging stalks of lemongrass in the crisper drawer. They’ve been there, silent, like an accusation, for weeks. I finally found a vehicle for their tender lemony brightness – meatballs. Specifically, Thai inspired meatballs. The lemon works well here, balancing the fish sauce and providing a nice bridge for ginger’s blustery heat. If you do not have access to lemongrass, a bit of zest would work; just don’t go crazy with it. A teaspoon or so should do.
My attempt to ‘sex up’ meatballs.
Lemon Ginger Thai Meatballs
1 Tbsp. chili garlic sauce
1.5 Tbsp. fresh ginger
2 Tbsp. cilantro
2 Tbsp. fish sauce
1 lb. grass fed ground beef
2 stalks lemongrass
2 Tbsp. coconut aminos
Fat of Choice (if you make this salad as a side, bacon fat is a fantastic fat to use)
Mince your ginger and cilantro. Add to a bowl with the beef, chili garlic sauce, fish sauce, and coconut aminos. Bash the lemongrass with the back of your knife to get the goodness out – chop and add to the bowl.
Form little ping pong sized balls and fry in fat of choice over medium heat until browned. Flip and brown.
Makes about 14 balls, enough to serve 2 for dinner + 1 for lunch.
This dish received the highest of praises from the DH. He not only ate every bite, he also said he really liked it. Sweet. Into the repertoire you go. While not strictly paleo as-written, you can easily swap something more paleo-friendly for the snap peas — tiny broccoli florets (broccoli overload!), kale, even celery would go great here. As would mango. Mmmmm … spicy mango.
Spicy Broccoli Slaw with Snap Peas and Bacon
4 ounces thick-sliced bacon, diced
2 tsp. grainy mustard (I use Maille)
1 tsp. chili garlic sauce (I use the kind with the chicken and flecks of garlic)
2 tsp. apple cider vinegar (I use Bragg)
1 tsp. honey
3 Tbsp. almond oil (or any neutral oil – grapeseed would be great)
6 ounces broccoli slaw
5 ounces sugar snap peas
Flaky salt and pepper to taste
Brown your bacon, drain and set aside. Make a vinaigrette out of the wet ingredients and whisk to form an emulsion. Toss everything together and serve.
Serves 2 for dinner. Great with a grilled meat (or in our case, some really substandard bratwurst).
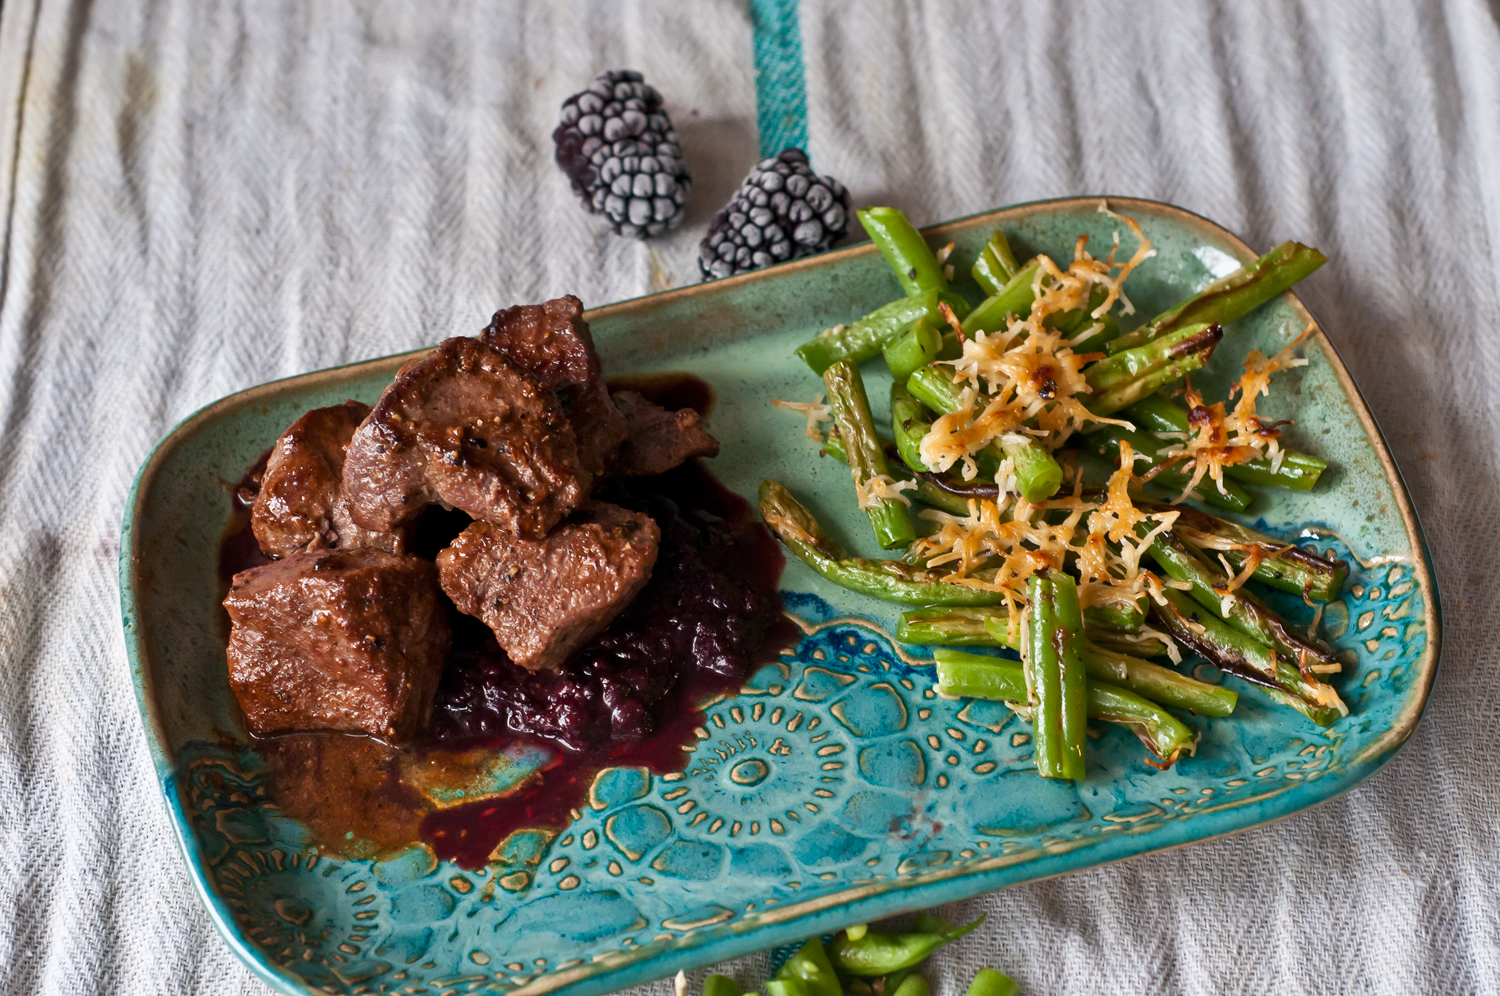
This dinner was provided courtesy of Weber Farm. I am fortunate enough to have a best friend that is not only kickass, but has her own home farm (with eggs I dream about and honey I use way too quickly) and whose male relations hunt often and hunt successfully. It was at her table, way back in college, that I first tasted venison and loved it. Despite her years of warnings that venison is a meat on advanced setting, I finally conned her into sending me home with some to try and make something fabulous out of. And I did. She sent me home with two perfectly portioned baggies of pre-chunked venison back strap – which I’m guessing she uses in a braise – and the instruction to make her something good so she can crib the recipe. I think she would have enjoyed last night’s (and the night before’s) dinner as much as I did.
A note about venison: Venison (deer) is a very, very lean game meat that doesn’t taste particularly gamey at all if cleaned and prepared right (luckily, those Webers know what they are doing). It tastes kind of like really lean beef and can get very tough and chewy if you either cook it too long or not long enough. Venison is a meat that needs added fat – it’s too dry without it – so don’t be afraid to finish with a little butter. I’ve had it cube steaked & chicken-fried, stewed, steaked, jerkyed, burgered, and sauteed and have loved it each and every way. Venison is awesome and it’s a shame I can’t just run to the store and grab some. That, by the way, is a hint that I would like more, please, next time I visit 🙂
If you don’t have access to venison, duck would be fabulous here. Or, if that’s out of range, beef or bison would be great as well. Even chicken would be tasty. Or pork. Really pretty much anything that walks or swims and is slow enough to let you eat it. Pork belly would be amazeballs.
While I’m on the subject of substitutions, this sauce I made for duck would be a fantastic sub for the blackberry wine sauce in the recipe.
Yes, I see that these are green beans. I took this picture when we had a repeat dinner the next night.
6 oz. blackberries – fresh or frozen (I used a frozen package of fresh berries)
1 c. red wine (use your favorite, or if you don’t have a favorite, something that one liking red wine would happily drink. None of that cooking wine crap.)
1/2 in. ginger, peeled and halved
1 Tbsp. honey (I used wildberry honey from Whidbey Island, but any good quality honey would do)
1 Tbsp. unsalted grass-fed butter
The Venison
10 oz. venison (I used pre-chunked backstrap)
1 Tbsp. coconut oil
1 Tbsp. unsalted grass-fed butter
Granulated garlic
Granulated onion
Salt & pepper
The Veg
1 bunch broccolini (or like in the picture, green beans)
2 Tbsp. fresh grated parmesan (or other hard salty cheese)
2 tsp. olive oil
Salt & pepper
First, get your sauce going. In a medium pan over medium heat, bring the blackberries and wine up to a boil. Reduce the heat to a simmer, add the ginger, and macerate to break the berries up. Simmer 20-30 minutes, or until the wine has reduced and the sauce gets a little thick. If you want it thicker, simmer longer. In the last 5 minutes of cooking, add the honey and taste for sweetness – if it needs more, wait a minute or two before adding. When the sauce is at your desired thickness, turn the heat off and drop the butter in, swirling to combine – the heat from the pan will melt it.
While the sauce is going, turn your broiler on high and place the veg on a foil-lined cookie sheet. Drizzle with olive oil, sprinkle with salt and pepper and cheese. Broil 10-15 minutes or until the cheese is browned and the broccolini is just about to start burning in spots.
The last thing you want to make is your meat, as this is pretty quick-cooking. In a large pan over medium-high heat, melt your coconut oil. Add the venison, and sprinkle with salt, pepper, garlic and onion. Cook until browned on that side. Flip with tongs quickly, sprinkle the other side with seasoning, and let go until browned on the other side. Ideally, you want your pieces to be medium-rare, so use your judgement. Venison cooks just like beef, and in my experience I was able to cook the large chunks perfectly, but had some chewy smaller bits. They were still delicious. When your meat has cooked to your liking, turn the heat off and drop the butter in. Toss to coat as the butter melts.
This is not a ‘healthy’ or ‘paleo’ recipe, but it is delicious. My mother in law makes this dip for family gatherings and special occasions (luckily us coming to visit counts as just such an occasion), and I love it. Crave it, even. It may or may not be the first thing I think of when I know a visit is imminent. Not that the in-laws aren’t great, but since one of the (many) reasons I married their son was his prowess in the kitchen; I’d say that getting excited about a visit (partially) because of food is not out of the question. Lucky for you guys, she was gracious enough to share the recipe and help direct the photography.
Buffalo Chicken Dip
10 ounces chicken breast (canned)
Frank’s Red Hot Sauce (the recipes calls for 1/4 to 1/2 cup; my MIL uses less if a non-spicy eater is in residence)
8 oz. cream cheese (full fat is best)
1/2 c. ranch dressing (Hidden Valley is the favorite)
1/2 c. sharp cheddar, shredded
Tortilla chips to serve
Preheat the oven to 350. Combine cream cheese, hot sauce and chicken in a medium pan over medium heat. Stir to combine until cheese is melted and chicken is broken up.
Remove from the heat, add the ranch, and stir. Pour into an 8×8 casserole dish and top with the cheddar. Bake 20-25 minutes and serve with tortilla chips.
Serves umm…. depends on who is in the house. If my sister in law and I are both there, maybe two? Three? She usually doubles or triples the recipe, depending upon how excited the two of us look.
*Drool* Ok, so this isn’t *technically* Carolina-style pig. I lack a pit and/or a smoker and am not bbq level confident about my grill skills, so this is a compromise. A damn tasty compromise. This pork is a great thing to have on hand when the midday munchies hit and gives you more than a week’s worth of lunch or dinner toss-in meat. Making a salad? Chuck in some pork. Need to use up some random veggies and half an avocado? Call it a stir-fry and add some pork. Craving pineapple, pork and vinegar? Well, there you go. You can make this wonder meat on a Sunday and eat it all week. Now that’s my kind of time vs. payoff investment.
Slow Roasted Pork, Carolina Style (paleo)
Based on the Momofuku Pork recipe posted on Yummy Supper
3-5 pounds pork butt (shoulder), skin removed
3 tsp. salt per pound (I used sea salt)
1 Tbsp. + 1 tsp. sugar per pound (I used regular white)
Black pepper
Time
Heat
1 c. apple cider vinegar (Bragg’s is awesome here)
1 Tbsp. brown sugar
2 tsp. Texas Pete (or other hot sauce if you must. you can also omit for a less spicy version)
Big pinch red pepper flakes
Few grinds black pepper
1 big pinch salt
Mix your salt, sugar and pepper together in a small bowl and sprinkle very liberally over the pork on all sides. Place in the fridge to cure for 24 hours.
Preheat your oven to 250 degrees F. Slap your pork into a cast iron skillet or similar pot and slip into the oven for 3 hours. After the 3 hour mark, baste once an hour for an additional 3 hours.
While your pork is going through its first stage cooking, make the sauce by combining all ingredients in a small saucepan and bringing to a boil. Stir until the sugar and salt are dissolved, remove from the heat, and let chill in the fridge a couple hours until ready to serve.
Pull when falling apart to the touch and a beautiful mahogany with a maddening smell. Pull with 2 forks like a dog burying a bone.
Slather with sauce and serve with everything – pineapple salsa, broccolini & avocado, just a fork … seriously, pork goes with everything. It’s the LBD of dinner meats.
This recipe grew from a craving. A pineapple and tomato craving. And what’s better to pair with pineapple and tomato than the salty tang of coconut aminos? Not much, I’ll tell you, unless you’re talking about heat. Fresh heat from diced jalapenos takes this salsa over the edge. The components are great in and of themselves, but with the slight pepper crunch from the jalapeno, something magical happens.
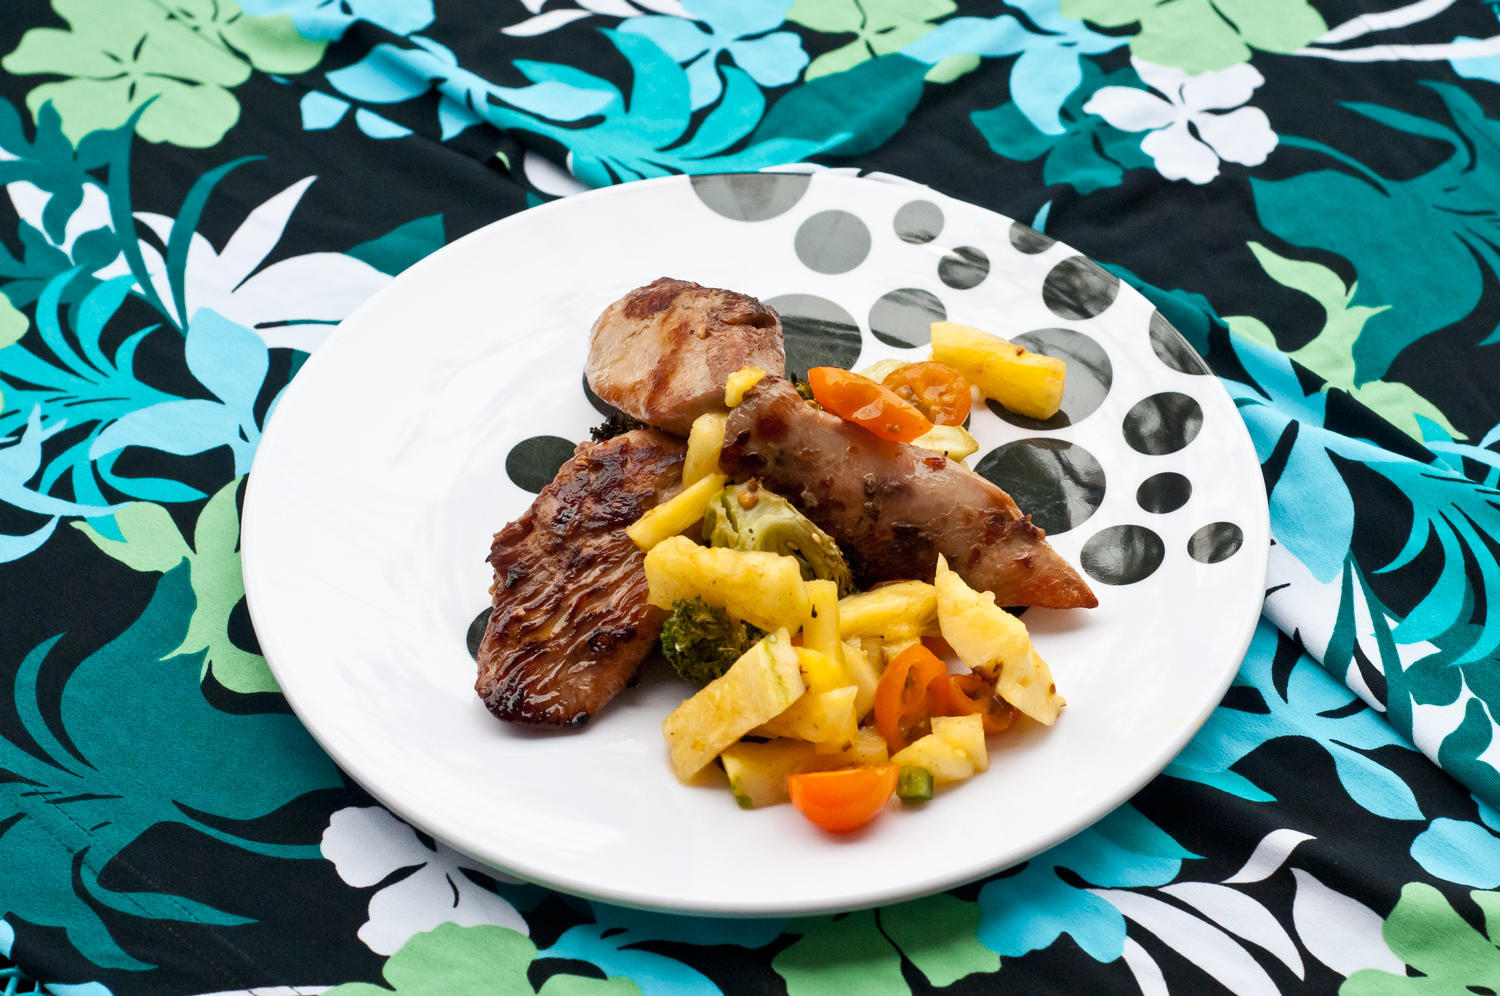
This recipe takes a little marinating time – about an hour – but the chicken comes out well worth it. This is a riff on a soy/pineapple/egg white chicken my mother used to serve and never fails to bring me right back to that dish, which at the time was one of my favorites and ever-so-exotic.
Tropical Chicken & Broccoli with Spicy Pineapple Salsa
Tropical Chicken & Broccoli
2 boneless skinless breasts chicken
4 Tbsp. coconut aminos
2 tsp. honey
1 big pinch red pepper flakes
2 c. broccoli
Drizzle olive oil
Pinch salt
1 tsp. sesame oil
1 Tbsp. sesame seeds
Spicy Pineapple Salsa
1.5 cups fresh pineapple
1 c. cherry tomatoes
1 tsp. honey
1/2 jalapeno
2 cloves garlic
1 tsp. rice vinegar
Big pinch flaky salt
1 tsp. chipotle powder (optional. I’m not sure it added anything to the dish)
First, get your salsa going. If you are using fresh pineapple, peel and core and cut into bite-sized pieces. If you’re going the canned route, do yourself a favor and pick pineapple in natural juice; you don’t want cloying sweet here since you’re looking to walk a balance between sweet, hot and tart. Add the pineapple to a medium bowl.
De-seed and dice the jalapeno, halve the tomatoes and crush the garlic. Add to the pineapple bowl, along with the honey, rice vinegar and chipotle powder if you’re using.
Stash in the fridge to give the flavors a chance to marry.
Cut the chicken into strips and add to a large plastic bag, along with the coconut aminos, 2 tsp. honey and red pepper flakes.
Marinate in the fridge for an hour.
While things are chilling, put your broccoli on a baking sheet, drizzle with oil and sprinkle with salt. Broil until starting to brown, flip, and continue broiling until nicely browned to just about where you want it – about 25-40 minutes depending upon how large your pieces are and how far from the heating source you place the rack.
When the broccoli is done, add to a large pan with the sesame oil and sesame seeds and toss to finish browning. Set aside.
Add some fat to the pan and sautee the chicken until done through and browned on all sides. Be careful while the chicken cooks, as the honey will want to burn. Keep it moving so that doesn’t happen.
Serve the chicken topped with salsa alongside the broccoli.
This is one of those meals where everything went wrong – I consciously decided to swap the main meat, the grocery was out of chorizo, I didn’t have as much adobo sauce and almond flour as I thought – and yet it all came together just fine into a damn tasty little dish, and not at all as meat clogged as I had thought it would be. I was expecting heavy, greasy, and to finish feeling like I’m on meat overload – happily, that was not the case here.
Yeah, that’s a meaty little snowman head and a meaty little mitten – in May – what of it? That’s just how I roll. With the cool kids.
Mini Turkey & Sausage Spicy Meatloaves with Seared Tomato Relish
1 lb. ground turkey
1 lb. fresh sausage (the original recipe called for chorizo; I used some sort of spicy ‘mystery sausage’ from the freezer and it turned out great)
1 Tbsp. adobo sauce (from a can of chipotles – read your label!)
2 eggs
Scant 2 Tbsp. almond flour (you can omit this alltogether and things will work out just fine – the meat mix will be a little wet but all will be well. If too-wet meat freaks you out, just halve or omit the egg – ground meat in a muffin tin is very forgiving)
1 large onion
5 cloves garlic
1 Tbsp. coconut oil
2 c. cherry tomatoes
1 tsp. adobo sauce + sriracha or more adobo if you have it and you need it for spice
2 Tbsp. olive oil
1/4 c. cilantro
juice of 1 lime (maybe more)
extra lime juice + 1/4 an avocado per person for garnish
Preheat the oven to 350 F.
Dice the onion and mince the garlic. Add to a medium pan with the coconut oil and sautee until translucent and beginning to brown around the edges.
Add half the onions & garlic to a large bowl and half to the bowl of your food processor.
To the bowl (not food processor), add the ground meat + sausage slipped of its casings + egg + flour + 1 Tbsp. adobo and mix by hand until incorporated.
If you’re a normal adult human and have “regular” muffin tins, you will need 2 for this recipe. If you’re like me and only have 1 tin of mini muffin cups and a couple novelty tins for making holiday cakes, muddle through as you can. Whatever kind of loaf you’re making, fill your cups, making sure not to fill each cup up more than 3/4 of the way through or you will have a hot mess on your hands. A hot mess and overflowing grease. Yum. I made 1 tin of mini muffins + 1 tin of snowman/mitten muffins + 3 burger sized patties fried on the stovetop.
Pop those babies into the oven and set the timer for 25 minutes.
While the loaves/muffins/snowmen heads are baking, toss the tomatoes into the pan you were using for the onions and let cook until blackened in spots and beginning to pop open. Add to the food processor, along with the remaining adobo, olive oil, lime juice, and 2 big pinches of salt. Process. Taste for seasoning; adjust heat/acid/salt if necessary. At this point, if your salsa is too wet (mine was), toss back into the pan and cook some of that liquid off. Make sure to re-taste for seasoning. Add the cilantro and set aside.
When your timer goes off, check the meatloaves. You’re looking for rendered fat on the top (you won’t have a whole heck of a lot if you’re working with turkey), and done looking bottoms. If you are using metal pans, you may have a nice crust. Silicone tins aren’t really into all that mess. If things look good, you’re in the clear. I was slightly worried about doneness (and was secretly hoping for a nice crust), so I jacked the heat to 400 and blasted the loaves for an additional 5 minutes.
Serve over a bed of sliced avocado, topped with the relish and a squirt of fresh lime juice.
Makes a bunch – I’m getting 4-6 servings (3 mini muffins, 2 snow men/mittens, or 1.5 burger patties per serving). Your mileage may vary.
Winter is over. It’s icy grip no longer holds us in unforgiving clutches, burrowing our heads and necessitating prolonged holing up under blankets and layers. With our newfound freedom, we dug the cameras out and went on an evening shooting trip to Brooklyn Heights to take in what is arguably the best view of lower Manhattan – the view from Brooklyn Heights Promenade.
There among fellow photogs, couples on a lazy stroll, families out for an evening, and teens fighting ennui, we plopped our tripod and settled in for an evening of long exposure shooting (and snacks).
These beauties were taken by my DH trying something new – panoramic HDRs. To quite stunning result, if I do say so myself.
Panoramic HDR of lower Manhattan – taken by my DH. Larger here.Panoramic HDR of lower Manhattan taken by my DH – Look! You can see from the Empire State Building all the way to the Statue of Liberty. Larger here.
These ones were taken by me, trying out some of my DH’s favorite techniques – HDR and long exposure.
Love the rainbow effect on those windows highlighted by golden hour raysFreedom Tower at night + a building I dubbed ‘cupcake tower’ for the eveningLower Manhattan at night – long exposure HDRPlaying with sunspots – HDRI want to shoot this stick dock in more detail.Me & JJ Abrams – lens flashes galore!
Craving a rich, decadent ragu, but cutting out unnecessary carbs? This is the recipe for you. This dish is luxurious and rich, comes together in about an hour, and feels like it took days to cook. It’s meaty, hearty, and paleo friendly. It even features one of my more favorite braised vegetables, that unsung hero of the kitchen, celery. Never had cooked celery? You’re missing out. Cooked celery goes all slumpy and soft, while keeping a slight fresh taste that just speaks of crisp spring days. Yum.
1 lb. celery
2 Tbsp. coconut oil
1 onion
2 oz. pancetta
15 ounce can plum tomatoes
1 lb. hot Italian sausage (4 links)
1 egg per person
2 tsp. or so butter
crushed red pepper
salt & pepper
Cut your celery on a diagonal into 3 inch pieces. Slice the onion very thin. cut the pancetta into strips or dice into cubes.
In a large pan, heat the oil on medium. Add the onion and sautee until light gold. Add the pancetta and cook until the fat becomes translucent. Add 2 links sausage, slipped out of their casings, and sautee (breaking up the sausage into bits as you go) until browned.
Once everything is nice and browned, add the tomatoes and their juice, crushing as you add to the pan. Nestle the remaining 2 sausages in the pan. Add the celery, red pepper flakes, salt and pepper and toss to coat well. Pop the lid on and knock the heat down to a steady simmer.
Simmer 15 minutes and check – I ended up cooking my dish for an hour in total to get the doneness I wanted; you may want to go less time if you want crisper celery. At an hour, the celery was nice and soft and the flavors were really well melded. Check every 15-20 minutes or so to make sure things aren’t getting too dry and to give a nice stir. If your mix does get dry, add some water or white wan to the pan. If the mix is too watery; take the lid off, raise the heat, and boil away the excess liquid.
While the ragu is simmering, fry your eggs in butter until the desired doneness – I went for runny yolks and the dish was luscious.
The weekend we returned from vacation, one of our favorite spots in Brooklyn – the Brooklyn Botanic Garden – was having its annual Sakura Matsuri cherry blossom festival. Instead of sitting on our laurels, we took a stroll amidst the heavenly scent of fresh blossoms and throngs of people vying for an uninterrupted selfie (or group selfie).
TulipsCherry Blossoms!And againMoreIn a pretty washAnd fadedSun drenched tulipsBasking in the warm spring sunshineRiot of colorDelicate
 My attempt to ‘sex up’ meatballs.