Sometimes I try to pretend that I don’t wait for this season all year long with varying degrees of patience. Some years, I’d like to think that it’s the corn I’m really after. The berries. Burgers on the grill. But who am I kidding? It’s tomatoes. Tomatoes are what I crave in the deep recesses of winter – tomatoes are what I pine for. Sweet, umami-laden globules of liquid sunshine.
This salad highlights their peak season glory perfectly – and lucky for me, I’m the only tomato worshipper in the house. It’s a dead simple thing to whip up for lunch – barely a recipe, really.
Mine… all mine 😀
Sweet Summer Sunshine – aka Tomato, Peach & Basil Salad with Chili
Mixed heirloom tomatoes – a cup, cup and a half – thinly sliced
1 ripe peach, pitted and sliced thinly
1 tsp. thinly sliced basil ribbons
1 Tbsp. grapeseed oil
1 tsp. sambal oelek (hot garlic chili sauce – I use the brand with the white chicken – it should be located near the squeeze bottle sriracha with the same chicken and comes in a clear plastic jar with a green lid) – sub for Whole30 sriracha if going that route
Your favorite finishing salt – I used some grey sea salt, but I could see black or Maldon salt being fabulous here, or even citrus-infused kosher
Arrange your tomatoes on a plate. Scatter peaches about until you have something that looks exciting and alive. Sprinkle with basil.
In a small bowl, mix the grapeseed oil and sambal oelek. Beat with a fork to combine.
Drizzle oil mixture over salad. Sprinkle with salt to finish.
Serves 1 for lunch. Feel free to scale up to feed a crowd. If you are making for a party, prepare as close to go time as possible. This salad is best at room temperature (I would never suggest refrigerating fresh tomatoes as it kills some of their taste) or even a little above.
Update: After writing this, my DH came home from work not hungry in the slightest for dinner. I ate this salad again for dinner beefed up with slivers of fennel, crumbles of feta and citrus salt. Yum. I might just have to hit the greenmarket this weekend so I can try a version with rosemary-infused olive oil, smoky cheese and orange….
This makes a satisfying and surprisingly hearty weeknight meal for two.
Italian Sausage, White Bean & Kale Ragout
1 lb. hot Italian sausage
1 onion, halved and sliced in 1/4 inch thick half moons
1 cup vegetable stock
2 Tbsp. sun dried tomatoes, diced
1 can cannellini beans, drained
2 fresh bay leaves
3 c. kale, washed and chopped
1 Tbsp. fresh thyme, chopped
1 Tbsp. preserved lemon, diced
1 Tbsp. white wine vinegar
Salt & pepper to taste
Hazelnut gremolata (optional, recipe below)
Put a large pan over medium heat. Add the sausage and cook until browned on all sides. Remove from the pan and set aside.
Put the pan back over the heat and add 1 Tbsp olive oil and the onions. Sautee until softened and beginning to brown.
Add vegetable stock, tomatoes, cannellini beans, bay leaves and kale. Sautee 10 minutes or until kale is wilted.
While your kale is working, slice the sausage into bite-sized rounds.
During the last 5 minutes of cooking, add the sausage, thyme, preserved lemon and vinegar. Taste. Salt and pepper if needed.
Top with hazelnut gremolata and serve.
Serves 2 for dinner with a little left over for lunch.
Hazelnut Gremolata
Toast 1/2 cup hazelnuts in a 350 degree oven for 6-8 minutes or until browned and smelling nutty. Cool & chop rough. Add to a bowl with 3 Tbsp. finely chopped parsley, the zest of 1 lemon, 1 clove minced garlic and a big pinch salt.
Toss a handful in anywhere you want a nice nutty crunch or need a hit of protein.
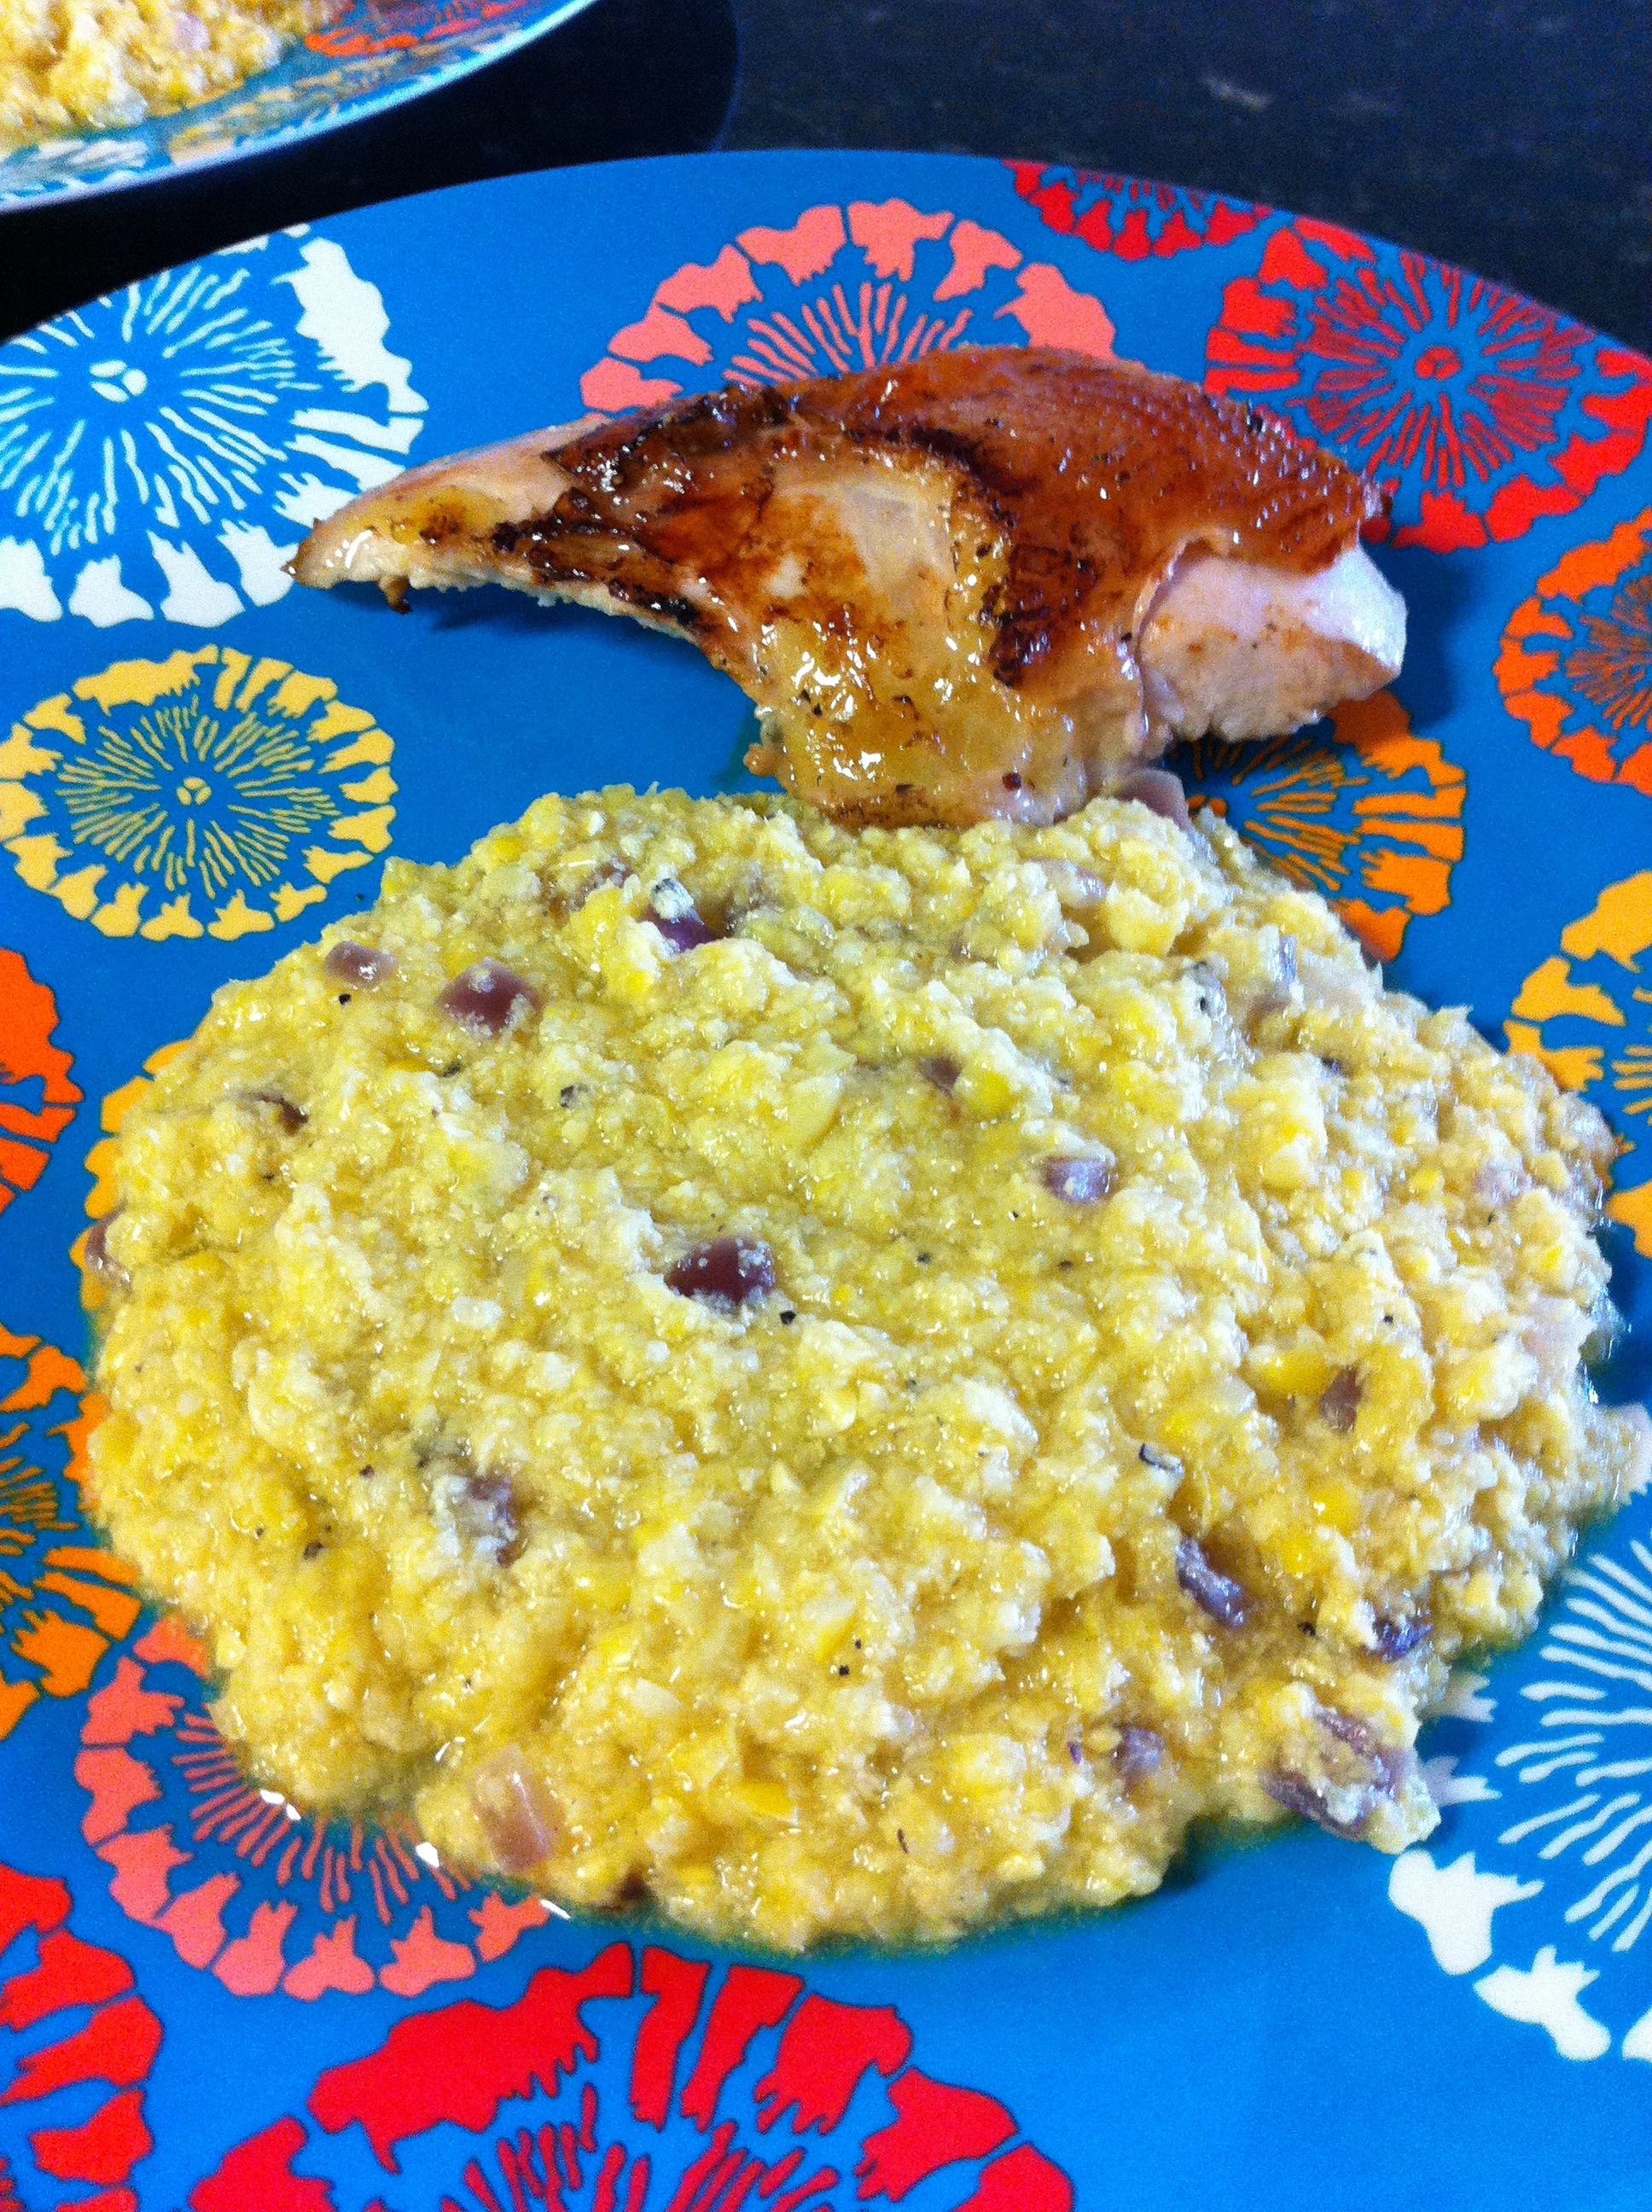
If your household is anything like mine, fresh ears of corn dominates the shopping list every week this time of year. And while I absolutely love my corn on the cob and various corn salad permutations, sometimes you just need something a little different. That’s where this creamy, risotto-like side comes into play. This dish takes the best summer has to offer and transports it to near fall amounts of decadence. It’s creamy, it’s hearty, and it makes the perfect accompaniment to a protein main (like the too-dry pheasant in the picture).
Risottoed Fresh Sweet Corn
4 ears corn
1/2 c. liquid – water, stock or milk
1/2 red onion
1 Tbsp. olive oil
1/2 c. Parmesan cheese
2 Tbsp. half & half
Salt & pepper to taste
Dice onion and set to sautée in the oil over medium-low heat.
Over a large bowl, de-kernel the corn and then run the back of your knife down the empty cobs to extract the milk.
Add the corn & 1/2 c. liquid to a food processor; whiz until the mixture looks like risotto.
When the onion is softened, add the corn. Raise the temperature to a simmer and cook, stirring frequently to prevent sticking, 20 minutes or until the desired consistency is reached. You want a loose risotto texture.
Add the cheese and half & half. Stir and cook another couple minutes to fully incorporate. Salt & pepper to taste.
This low-in-sugar jam has a slightly smoky, slightly tangy taste in the background (don’t worry – it’s not enough to overpower the berry taste) and makes a great add-in for freezer pops, ice creams, etc.
Strawberry Chipotle Jam
1 lb. strawberries, washed and de-stemmed
2 Tbsp. sugar
In a large skillet over medium heat, mash the strawberries and sugar with a potato masher until the berries are broken up and well on their way to being somewhat smooth. The sugar should disappear.
Add
1 Tbsp. adobo sauce from a can of chipotles
2 Tbsp. Jack Daniel’s Honey
Bring up to a low boil, drop the heat and simmer (slow tiny bubbles every once in awhile) about 20 minutes or until thickened and sludgy. When you drag a wooden spoon through the mixture, you should have clear tracks left.
Pour into sterilized glass canning jars (making sure to leave some head room) and screw on the lid.
I don’t know about your neck of the woods, but in mine, we’ve been having a heat wave. And I thought it got hot in South Florida — It does, but this heat is something different. In Miami, you have a nice-to-annoying breeze continually wiping the land clean – dragging humid air in its wake. In NYC, you have humidity as well, but asphalt everywhere and tall buildings that alternately create wind tunnels and block all air from moving. It’s taking some getting used to, especially when the mercury tops out at 103, a temperature I haven’t seen since living in northern Florida.
So, what do you cook for dinner when going outside means flirting with immolation? Watermelon salad. This salad is cool, sweet, hot, savory, and delicious. I’ve been eating big bowlfuls by itself for lunch and dinner, but you could serve alongside some form of quick-cooking meat in tube or patty form to round out a meal for more than one if you can stand the heat.
A note on buying watermelon: This recipe is easiest when made with a seedless varietal, but I wasn’t thinking about that when selecting my melon – I was more excited by seeing something new – the deep green Sugar Baby Red variety – than I was concerned with practicality. If you don’t happen to remember seedless watermelon, no biggie, just more prep work will be involved to pick the seeds out.
‘It’s Too Hot To Cook’ Watermelon Salad
4 c. watermelon, chopped into 1/2 inch pieces (bite sized)
3 Tbsp. fresh basil, chopped fine
Most of a pint of cherry tomatoes, halved
1 cucumber, diced
5 scallions, sliced thin
2 jalapenos, de-seeded and diced
1/2 – 3/4 c. feta, crumbled if in a block (optional)
2 tsp. fresh lime juice
2 Tbsp. the best (thickest) balsamic vinegar you can find
Combine everything in a large bowl, stir to combine, and set back in the fridge for 20 minutes or so to marry.
Makes a ton – I’ve gotten at least 3 big bowls out of the batch I made.
Banana pudding. ‘Nanner puddin’. Whatever you call it, it brings back childhood memories of deep bowls of sweet goodness, quick gobbling up of leftover Nilla Wafers, of licking the spoon clean. Nostalgia in a bowl.
If you’re not familiar with banana pudding, it’s a (mostly Southern) layered trifle-style dessert made from pudding (vanilla or banana), fresh banana slices, Nilla Wafers or ladyfingers, and some sort of meringue or Cool Whip topper if you’re fancy. There are a thousand recipes and philosophies surrounding the dish, and it seems like every little old Southern lady has her own tried-and-true recipe – some even come out a radioactive shade of yellow and are still fabulous.
My version takes the essential ingredients for a successful ‘nanner puddin’ – pudding, bananas & Nilla Wafers – and transforms them into a cold summer lactose-free dessert. It works. It’s not quite the same as tucking into a huge bowl of silky goodness, but it is a good treat nonetheless.
A note about using dairy-free milk in making pudding: Your box (if you buy Jello brand at least) will say that instant pudding cannot be made with soy milk. It lies. The box also calls for 2 cups of cow milk. Forget that too. If you halve the milk, soy sets up just fine. If you were to use the full 2 cups, the result would be a watery mess; but if you use 1 cup, the pudding sets up nice and stiff. You won’t get as much yield, but if lactose isn’t your friend, this is a small price to pay.
Banana Pudding Pops
1 package fat free instant Vanilla pudding
1 cup Silk soy milk (I would imagine almond milk would work too)
1 large handful Nilla Wafers
1 1/2 Tbsp. butter
1 banana, sliced thin
In a medium bowl, whisk the pudding mix and milk. Stick in the fridge and let set up at least an hour.
When your pudding is set and ready to go, crush the wafers and put into a small bowl. Melt the butter, add to the wafers, and mix well. We’re essentially making pie crust crumbles. I suppose you could omit the butter, but I wanted something that would help bind the crumbs and hopefully make them freeze in a pop without crumbling and dumping half in my lap. Success!
Slice your banana and set close by.
Fill your popsicle receptacle in layers, starting with a little pudding and adding layers of crust and banana as you go until you reach the top. Make sure each layer of crust is anchored in a layer of pudding and take care to not make these layers too thick or you risk creating an un-structurally sound pop. I made sure to end with pudding as well for the same reason. Also, make sure to bang your molds in between layers so you don’t get a bunch of empty bubbles. This isn’t the most easy thing to do with something like a rocket mold, but we work with what we have.
Freeze a few hours to overnight.
Makes 2 full and 4 almost full rocket pops. Next time I might add a drop of extra vanilla to the pudding and maybe experiment with an additional 1/4 cup of milk – I think the pudding mix can support it (it was on the thick side), but I have not tested that theory yet. If things are looking a little slack, add more banana to fill the space.
This potato salad makes the perfect foil for grilled meats on a hot summer’s night and only improves in the fridge. It has enough heat to make things interesting, but not so much that the fire department needs to be called.
Spicy Potato Salad
1 lb. baby red potatoes
2 Tbsp. mayo (we use olive oil-based)
3 Tbsp. olive oil
1 Tbsp. lemon juice
1 Tbsp. capers
1 tsp. red wine vinegar
1/4 onion
2 eggs
2 ribs celery
1 Tbsp. canned chipotle
Wash your potatoes, halve (you want potato chunks that are roughly uniform in size and around the 1/2 inch) and place into a large pot. Add enough water to cover by a few inches and a palm full of salt. Bring to a boil and let boil 8 minutes or until soft but not disintegrating.
While the potatoes are cooking, place your eggs into a small sauce pot and cover with water. Bring up to a boil and let boil 4 minutes. Set aside until cool enough to handle. Peel and slice thin.
Dice the chipotle and add to a large bowl. Add the mayo, vinegar and lemon juice and whisk, streaming in the olive oil as you go, until a dressing is formed. Salt & pepper to taste.
Dice the celery and add to the bowl.
Slice the onion wafer thin and add to the bowl.
Add the capers.
When the potatoes are done, drain and add to the bowl. Stir to combine.
This all started with a chance encounter at a friend’s graduation party. Jack is said friend’s best drinking buddy, and it was inevitable that “he” would make an appearance. I, on the other hand, am not generally a fan, generally thinking that Jack Daniels tastes like yicky and disappointing paint thinner. Enter Jack’s sexy, swingy new cousin: Jack Daniel’s Tennessee Honey (or Honey Jack).
Honey Jack is a smooth talker. So smooth in fact, that this alcohol taste hating girl did shots without attempting to hide under the table and/or talk her way out of subsequent rounds. I took mini shots to be fair, but shots nonetheless. Shots with no chaser or fear of immediate impending death from the taste. This is (?)progress(?).
While sitting in my little chair, enjoying the crazy good potluck buffet and company of my graduate girl and the other people in her life, I hatched a diabolical idea. Honey Jack ice cream. Had to be fabulous. Must be 1st ice cream on menu for summer eating.
This singular obsession took up much of my Jack-addled attention span for the remainder of the party – egg base or yogurt? Lactose light or go for the gusto? Gelato? To Caramel Or Not To Caramel… that is the question.
The Internets came up with a fabulous template for my idea. Over at Ezra Poundcake, a Mad Men-inspired ice creamy dream, Bourbon Vanilla Ice Cream with Salted Bourbon-Caramel Sauce and Buttercrunch Toffee looked beyond drool-worthy. I’m too uncoordinated (read: lazy) to accomplish ice cream, caramel sauce and toffee at the same time for a simple summer (non fete) treat, so I just stuck with a lighter in lactose version of the ice cream. And then, because well enough should never be left alone, served it in a deliciously adult root beer float.
A note about the ice cream: The way I made it creates a boozy dessert with a nice texture (not quite as creamy as knockout rich full-lactose cream but not as ice shard-y as some “alternative milk” varieties). This ice cream was light enough that I didn’t almost die from lactose-induced bloat. I cut back on the sugar content because I always cut back on the sugar content, and this dessert was perfectly sweet to me. My DH wanted a bit more sugar (and in all fairness, the root beer float was his idea). In the float, he said it was perfect. Out of the float, he would have liked the aforementioned caramel sauce. If one of your party isn’t a freak about sugar and in love with savory desserts, go for the float. Or the caramel. I’m dying to have the graduate over so I have to make the caramel (I’m thinking dulce de leche-style creamed caramel with pecan brittle – ‘cuz what’s more Southern than bourbon & pecans?).
Not much to look at, but damn it’s good
Honey Jack Ice Cream
1 cup Jack Daniel’s Tennessee Honey
1/4 cup sugar (I used white sugar, but a brown sugar would probably be killer here. Maybe even honey)
1/4 tsp. kosher salt
1 generous cap-and-a-half vanilla extract (the best quality you can get – I prefer using extract here rather than whole beans)
2 cups heavy cream (I used the “real” stuff here)
1 cup Silk soy milk (unflavored)
4 large egg yolks
Bring the bourbon to a boil in a medium saucepan over medium-high heat. Once your bourbon hits the boil, add the sugar and salt. Stir until the sugar dissolves (about 2 minutes). Kick the heat back to medium and let go another 2 minutes while you get your next steps ready. The original recipes calls for reducing the mixture by a fourth, but I wanted a more sharp boozy taste, so I kept the boiling to a minimum.
Add the vanilla and cream and heat until a candy thermometer reads 150 degrees F (about 2-3 minutes).
While that is coming together, add your egg yolks to a large bowl and grab your whisk. Start beating the yolks. When your bourbon cream is at the proper temperature, pour into the egg mixture in a thin stream, whisking like a madwoman (or man) to incorporate enough cool air into the mix so the eggs don’t cook. Continue until the liquids are fully combined.
Add the soy milk and transfer to a bowl with a lid (or the bowl you already dirtied with a plastic wrap cover) and refrigerate at least 4 hours until thoroughly chilled. I let mine go for a full 24 hours because I made the base instead of concentrating on making dinner one night.
After everything is good and chilled, make your ice cream like usual. I use a Kitchenaid stand mixer with ice cream attachment (don’t forget to freeze your bowl overnight!).
If your ice cream comes out like mine did, it will be a little on the soft side at first. Mine took a good overnight freezing to set and never got rock-hard. My DH thinks I might not have whipped it long enough, but I think it tasted just fine, and that is all that matters.
Makes enough for 2 nice-sized summer night ice cream bowls and 3 generous root beer floats.
This dish makes the perfect accompaniment to any summer grilled entree, from veggie burgers to sausage or steaks. Yum.
Roasted Corn Salad with Avocado Mousse
4 ears corn, shucked
1 red bell pepper
1 avocado, halved and separated from its skin
2 limes, halved
1/4 red onions, diced
1 Tbsp. basil, diced
1 Tbsp. cilantro, diced
2 cloves garlic, diced
1 tsp. cumin
1 tsp. chili powder
1/4 c. creme fraiche
1 squirt sriracha
Salt & pepper to taste
On a medium-high flame, grill the corn until blistered all over and burned in spots. Don’t worry – slightly burned corn tastes great.
Grill the pepper until the skin has blackened on all sides and is starting to split.
Grill the avocado until well marked.
Grill the limes until well marked and juicy. This is the perfect preparation for limes that have gotten a little hard, as the heat brings the juices right back out.
Remove everything from the grill as it is done and set aside to cool.
In the bowl of a food processor, combine the avocado, creme fraiche, juice of 1 lime, 1 squirt sriracha and half the garlic. Process until smooth. Season with salt and pepper. If this mixture is thicker than you would like, thin with a little water. I wanted a mousse-like consistency.
When the veggies have cooled enough to handle, peel the pepper and chop. Stand the corn up on its cut-from-the-stalk end and run your knife slowly down the cob to separate the kernels, making sure to get down to the hard cob core. You may want to do this in a big bowl or on a big chopping board – things can get a little messy.
Combine the corn kernels, pepper, the juice of the second lime, basil, cilantro, second half of the garlic, cumin and chili powder in a bowl. Taste. Season accordingly and serve topped with avocado mousse.
This quick weeknight meal comes together in a flash. You get a great depth of flavor from the hit of miso and preserved lemon and a light, perfect-for-spring healthy meal.
Pea and Pepper Quinoa with Lemon and Miso
1 cup quinoa
2 c. vegetable stock
1 tsp. preserved lemon, diced
2 c. snap peas, tipped and chopped
1 tsp. white miso
1 orange bell pepper, diced
1 Tbsp. olive oil
S+P to taste
In a medium pot over high heat, bring the quinoa and stock up to a boil. Knock the heat back to a simmer, cover, and cook 20-25 minutes or until the quinoa curlicues open and the grain softens.
Meanwhile, heat 1 Tbsp. olive oil over medium-high heat in a large-ish pan. Add the pepper and sautee, stirring frequently, until the edges start to brown.
Add the peas and continue cooking until they are crisp-tender.
Add the miso and stir until combined.
Add the cooked quinoa and preserved lemons. Toss. Season with salt & pepper to taste.