Paleo Mac & Cheese

Holy crap yum. This dish is freaking delicious – and managed to taste like cheese. Without creepy nutritional yeast! Or actual cheese! Yay! 

Gluten-free, paleo, vegetarian-ish 
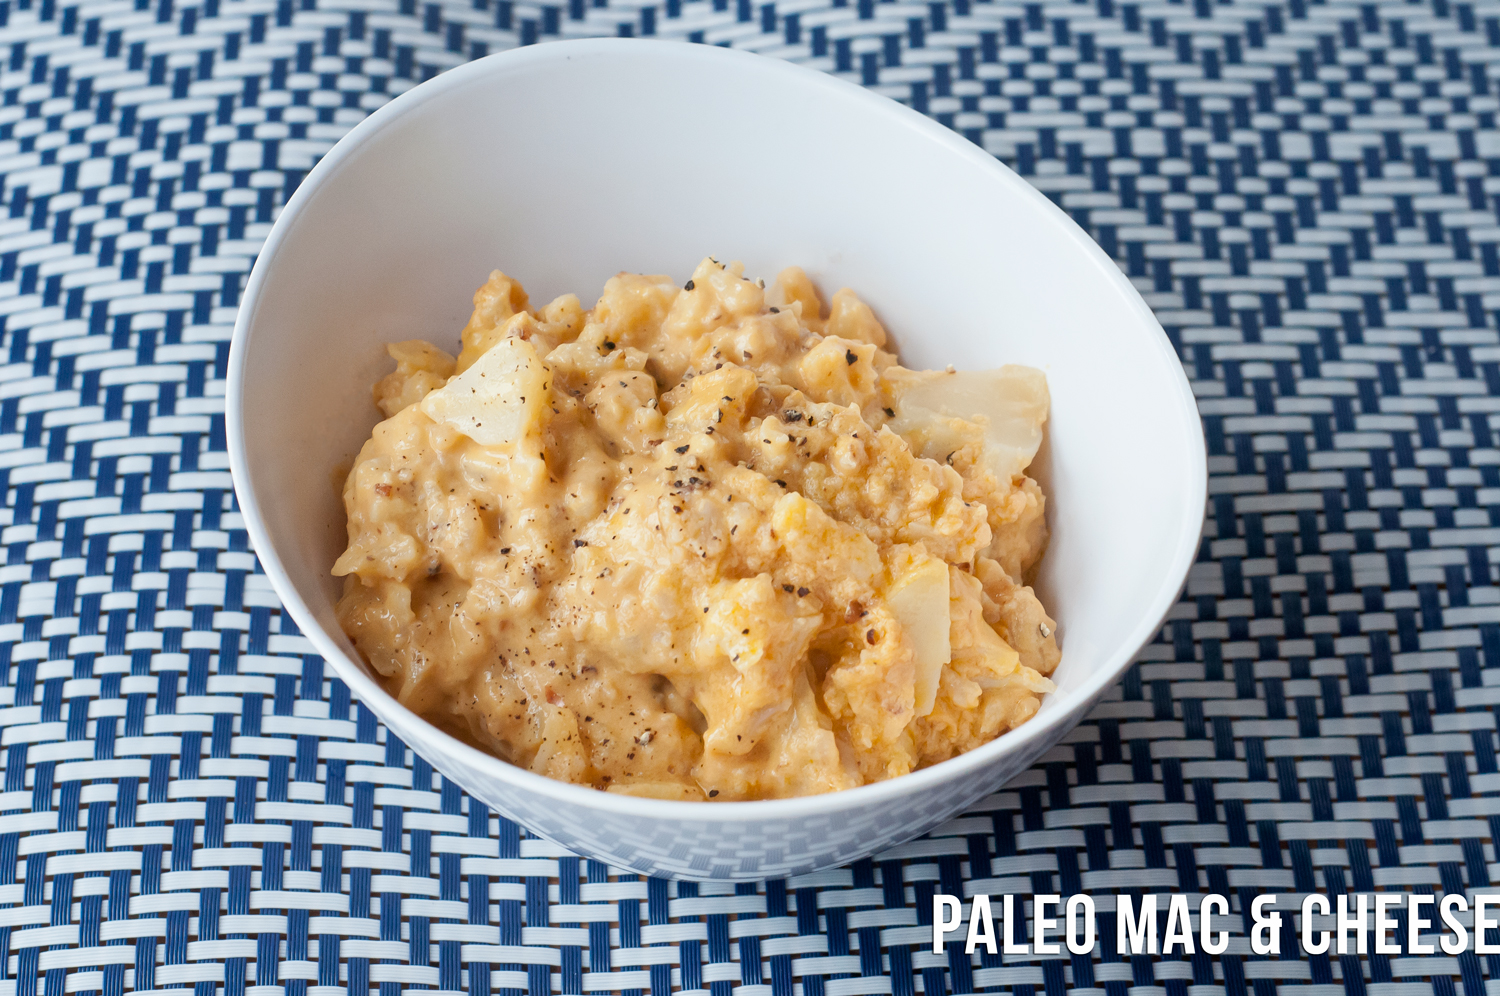
_DS35596w
 

Paleo Mac & Cheese 
Based on Paleo Mac N Cheese from My Natural Family 

1 head cauliflower
4 Tbsp. unsalted grassfed butter
1/4 cup water
2 Tbsp. pumpkin puree (100% pumpkin)
1 small carrot (about 1/4 to 1/3 c. diced)
1/2 small onion (about 1/3 c. diced)
Granulated garlic
Ground mustard
1 can full-fat coconut milk
1 egg
Kosher Salt
Black pepper 

Core your cauliflower and break up into small pieces (you want it to look like macaroni when you’re finished). 

Add to a large pan over medium-high heat with 2 Tbsp. butter a generous pinch of salt, and the water. Cover and steam 5 minutes or until mostly tender. 

Remove the lid and sauté for a few minutes, or until the cauliflower is lightly caramelized in spots. 

Remove from heat. 

While the cauliflower is working, dice the carrots and onion and add to a saucepan with 2 Tbsp. butter, the pumpkin, 1 tsp. mustard powder, 1 tsp. granulated garlic and a generous pinch salt. Sauté 5 minutes, or until onion is translucent. 

Add the can of coconut milk and bring up to a simmer. Simmer 10 minutes, or until the veggies are tender and the milk has reduced by 2/3. 

During this time, taste for seasoning. The original recipe called for 3/4 tsp. mustard, 1/2 tsp. garlic powder, and 1 tsp. salt (to me, this tasted like coconut milk). I ended up using more like 2 Tbsp. of each to get the cheese taste I wanted. 

When your sauce has reduced and your seasoning is where you want it, transfer the mix to a blender and puree until smooth. 

Once the mix is smooth, add the egg and continue pureeing until incorporated. The puree will cook the egg, which will thicken the sauce. If you do this quickly, your sauce will be velvety. 

Taste again for seasoning. Add more salt/mustard powder/garlic powder/pepper if necessary.

Pour over the cauliflower and toss to coat. 

 Serves 2 for dinner + 1 for lunch when combined with simple pan-sauteed chicken breasts.   

Instant Pot Salsa Verde Pork

This is a fantastic pork dish. The salsa creates a great little sauce and the flavor can be dressed a bunch of different ways when dealing with leftovers.

Gluten-free, paleo, Whole30

IMG_8620

Instant Pot Salsa Verde Pork

5 lbs. pork shoulder
2 Tbsp. coconut oil
2 Tbsp. Kosher salt
1 Tbsp. ground cumin
1 Tbsp. chili powder
1 onion, sliced thin
3 cloves garlic, smashed
2 tsp. dried oregano
Juice of 1 orange
3 Tbsp. lime juice
1 jar Salsa Verde (Trader Joe’s brand is Whole30 compliant)
1/2 of the empty salsa verde jar water

Sprinkle the pork with the salt, cumin and chili powder.

Press the Saute button to preheat the cooker. When “Hot” appears on the display, add the coconut oil and brown your meat.

Add the onion, garlic, oregano, orange and lime juices, salsa and water. Seat the lid on the pressure cooker.

Press the Manual button and use the + button to program 90 minutes cooking time.

When the finished beep sounds, it is best to let the machine release its pressure naturally if possible (takes about 20 minutes). Always check to make sure the pressure valve has dropped before removing the lid.

This is great served as-is, but if you want to go a step further and make crispy carnitas, kick your broiler on high. Spread the pork out on a baking tray covered in foil. Strain the cooking liquid and de-fat if desired. Pour over the meat and broil 5 minutes. Stir, broil 5 minutes more – or until desired crispiness is reached.

Unstuffed Cabbage Roll Casserole

Mmmmmm … cabbage rolls. I remember the cabbage rolls of my childhood fondly – except I never thought they had enough cabbage. I would have been happy if my mother served equal parts cabbage, ground beef and tomatoes. The rice I liked, but nowadays don’t need.

This recipe is cobbled together from different Internet sources, but draws mostly on inspiration from a recipe I found on Health-Bent.

Gluten-free, paleo, Whole30

IMG_8621

Unstuffed Cabbage Roll Casserole

1 head green cabbage
1 Tbsp. ghee
1/2 lb. ground beef
1/2 lb. ground pork
2 big hot Italian sausages
2 Tbsp. onion powder
3 Tbsp. granulated garlic
2 Tbsp. Hungarian paprika
2 tsp. ground cumin
Koser salt & pepper
1 (14 ounce) can fire roasted diced tomatoes
2 tsp. apple cider vinegar

Preheat your oven to 350 F.

Core your cabbage and cut into thin ribbons. Boil in a large pot of salted water for 10 minutes. Drain and toss with a few sprinkles salt.

While that is working, brown your meats in the ghee. Add the spices and combine. Let go a few additional minutes. Add the tomatoes and vinegar and mix well.

In a large casserole or baking dish, layer your cabbage with meaty tomato mixture – I used a large glass baking dish and had two layers of cabbage with one layer of meat. Do whatever makes you happy.

Bake 1 hour or until the top is browned and everything looks casserole-y. Let sit 30 minutes before serving so the juices can distribute evenly.

Serves 4 fairly comfortably. 

Sesame Ginger Chicken Zoodles

This dish is quick to throw together, uses minimal ingredients I usually have on hand anyways, and is waaaaay better than takeout. A win/win/win situation.

_DS35582w

Paleo, Gluten-free, Whole30

Sesame Ginger Chicken Zoodles

1 large zucchini
1 lb. boneless skinless chicken thighs
1 Tbsp. sesame oil
1 tsp. grated fresh ginger
1/4 tsp. white pepper
1 tsp. red chili flakes
1/4 cup toasted cashews

Sauce

2 Tbsp. sesame seeds
2 Tbsp. rice vinegar (which is surprisingly W30 compliant)
2 Tbsp. coconut aminos
1 Tbsp. grated ginger
2 cloves grated garlic
1 Tbsp. tahini
2 Tbsp. sesame oil
1/4 tsp. white pepper

Heat 1 Tbsp. sesame oil in a large pan over medium-high. Chop the chicken into bite-sized pieces and add to the pan. Add the rest of the chicken ingredients and stir-fry until the chicken is cooked through and browned.

While your chicken is working, make your zoodles (I absolutely love my Gefu spiralizer for this). In a small bowl, whisk the sauce ingredients together.

To serve, toss the chicken with the zoodles and sauce.

Serves 2 for dinner

Caramelized Onion Meatballs

This is based on a recipe posted by one of my Nerd Fitness Whole 30 partners in crime – Fonzico. Her version adds cauliflower and egg as a meatball binder (think breadcrumbs and egg in “regular” meatballs) and sounds delicious as well. I couldn’t find cauliflower at the store this week, so made these balls using my general method.

And they came out well. A little sweet from the onions, moist and light from the added ingredients and pretty perfect atop a pile of zoodles drizzled with some nice aged balsamic vinegar. As reported by the hubbs, they are also good with leftover baked ziti.

Gluten-free, paleo, Whole 30

2015/01/img_8557.jpg

Caramelized Onion Meatballs

1 lb. grass fed ground beef
1 medium onion
1/2 tsp. baking soda
1/2 tsp. water
1 Tbsp. ghee
Salt & pepper

First, we’ve got to knock those onions out. Peel and dice your onion and add to a medium-high pan with the ghee. Sauté until just beginning to brown, bring the heat to low, and let go about 45 minutes (stirring every once in awhile) or until the onions are sticky, broken down and a deep caramel color – if your pan gets too dry at any time, add a little water and stir. Let cool.

Preheat your oven to 375 F and line a baking sheet with foil.

Combine the onions with the rest of the ingredients, making sure to not overmix. Form into ping pong sized meatballs, placing the finished balls on the sheet as you go.

Bake 25 minutes or until browned and cooked through.

Serve with zoodles & balsamic for a simple dinner. Makes enough for 2-3.

Instant Pot Green Curry Chicken

This is the second meal I made with my new Instant Pot, and I’ve got to say I’m digging it. I’m still not sure where it will fit in with my beloved crock pot (I think it can replace it), but I’m liking it. This dinner came together quickly, the broth was flavorful, and the flavors married a bit.

I served this dish with the Oven Roasted Cauliflower Rice from The Clothes Make The Girl. This rice method wasn’t bad – the cauli got a little nutty from the heat, and it was a hands-off cooking approach.

Gluten-free, paleo, Whole30

2015/01/img_8507.jpg

Instant Pot Green Curry Chicken 

Curry
4 chicken thighs (boneless skinless), cut into cubes
1 Tbsp. diced ginger
1 onion, thinly sliced
4 cloves garlic, minced
4 carrots, roughly chopped
1 Tbsp. fish sauce (Red Boat)
2 Tbsp. green curry paste (Thai Garden is compliant)
1 can coconut milk
2 Tbsp. coconut oil
2 Tbsp. lime juice

Topper
1 big radish, diced
2 Tbsp. cilantro, minced
1/4 c. almonds, toasted and crushed

Press the Saute button to preheat the cooker. When “Hot” appears on the display, add the coconut oil and brown your meat. Add the garlic, onion, ginger, and curry paste;  sauté a few minutes more.

Add the coconut milk, carrots, lime juice and fish sauce and seat the lid on the pressure cooker.

Press the Manual button and use the – button to program 15 minutes cooking time.

While your curry is working, make the topper and your rice.

Toast the almonds and chop. Dice the radish. Mince the cilantro. Toss together with a little salt. Your rice cooks at 425 F for 20 minutes (stir after 10).

When the finished beep sounds, it is best to let the machine release its pressure naturally if possible (takes about 20 minutes). Always check to make sure the pressure valve has dropped before removing the lid. If you can’t/don’t want to wait that long, follow the Instant Pot directions on safe lid removal.

Serves 2 for dinner


Instant Pot Pulled Pork

My DH bought me a new toy this Christmas: the Instant Pot. So far, I’m a fan. I’ve made bone broth, which was as delicious as it was quick; this pork, which was really good and way quicker than my slow-cooker method; and a tasty little Thai curry dish I’ll be sharing soon.

And, since this thing cooks so quickly, I have enough extra broth on hand to finally have a go-to stockpile. Whoo hoo!

2015/01/img_8472.jpg

Gluten-free, paleo, Whole30

Instant Pot Pulled Pork with Spiced Roasted Parsnips

Pork
3-4 lbs. pork shoulder, trimmed of skin
1/2 c. broth
2 Tbsp. apple cider vinegar
1 Tbsp. fish sauce (Red Boat is W30 compliant)
1 Tbsp. chipotle powder
2 Tbsp. chili powder
1 tsp. salt
10 grinds black pepper
2 Tbsp. garlic powder
1 Tbsp. onion powder
2 Tbsp. coconut oil

Parsnips
1 lb. bag parsnips
2 Tbsp. Ras el Hanout spice mixture
2 tsp. hot Hungarian paprika
2 tsp. walnut oil
Big pinch salt

Press the Saute button to preheat the cooker. When “Hot” appears on the display, add the coconut oil and brown your meat.

Add the spices and liquids and seat the lid on the pressure cooker.

Press the Manual button and use the + button to program 90 minutes cooking time.

While your pork is working, make the parsnips. Preheat your oven to 450 F and line a baking sheet with foil.

Cut parsnips into 3-inch sticks.

Toss on the baking sheet with the oil and spices and spread evenly, making sure all are in a single layer.

When the oven is heated, bake 10 minutes, flip, and bake an additional 10 minutes.

When the finished beep sounds, it is best to let the machine release its pressure naturally if possible (takes about 20 minutes). Always check to make sure the pressure valve has dropped before removing the lid.


Rosemary And Preserved Lemon Pork Stir-Fry

This week’s recipe was a fluke. Not what I’d planned (though, admittedly, I didn’t have much in the way of a plan). My DH got called out to work and wouldn’t be home for dinner, so I grabbed bits and bobs left over in the fridge and cobbled something together. I had originally thought to go Asian in inspiration, since that’s my most comfortable fallback – but then I saw the half-dead packet of rosemary sadly staring at me from the cheese drawer and knew I should use that instead.

So behold – a Fr-talin-ican inspired stir-fry using up some fridge staples. And a glimpse into the kind of flavor experiments I conduct when I’m alone – inspiration totally cribbed from this great series on Lady and Pups.

Gluten-free, paleo & Whole30 

IMG_8263.JPG

Rosemary And Preserved Lemon Pork Stir-Fry

6 ounces thinly sliced pork chops, cut into strips
2 medium carrots, sliced on the bias about 1/8″ thick
2 stalks celery, sliced on the bias about 1/8″ thick
1 tsp cumin
1 sprig rosemary, chopped
1-2 Tbsp. preserved lemon, minced
1 Tbsp. coconut oil
Salt & pepper

Heat a cast iron skillet or other large pan over medium-high heat and add the oil. Add the carrots and cook, stirring frequently, 2 minutes or until they look like they’re beginning to soften (I prepped my celery, rosemary and lemons here).

Add the celery and cook, stirring frequently, a couple of minutes (I prepped the rest of my ingredients here).

Add the pork, 2 big sprinkles salt, a few grinds black pepper and the cumin and toss.

Cook, stirring frequently, until the carrots are browned and soft and the pork is cooked through.

Serves 1 for dinner

Burnt Radicchio Salad with Pear and Maple

This recipe was born out of the need to burn fall with fire. Call it bleeding frustrations, getting rid of demons, or just simply not getting enough fire with my wintery weather while on vacation, but I came back with an urge to burn things – specifically, food things.

Why so destructive? Slightly burnt around the edges radicchio is fantastic. So are toasted nuts. And butter. And pears – I thought long and hard about caramelizing these, too, but since no one has seen fit to festoon me with a blowtorch it didn’t happen. It might in the future, though. Maybe Santa will bring the gift of fire.

Gluten-free, paleo, vegetarian friendly, vegan friendly

_DS35545w

Burnt Radicchio Salad with Pear and Maple

1/2 head of radicchio
Drizzle olive oil
1/4 c. crushed pecans
1 Tbsp. ghee
1/2 pear
Drizzle maple syrup
Kosher salt & black pepper
Leftover flank steak (optional but delicious)

Set your broiler on high and tinfoil a cookie sheet. De-stem your radicchio and cut into two chunks. Place onto the prepared sheet, drizzle with olive oil and sprinkle with salt and pepper. Broil 5-6 minutes, or until blistered and burning at the edges. Not incinerated, just lightly burnt around the top and edges.

While your radicchio is burning, toast your pecans in the ghee over medium-high heat until they smell nutty. Remove from the heat.

Slice your flank steak and pear into thin slivers.

When the radicchio is done, chop into bite-sized pieces and add to a serving vessel. Top with the sliced pear, flank steak if you’re using and pecans. Drizzle with a teaspoon  or so of maple syrup and hit with another pinch of salt and few twists of pepper. Viola.

Serves 1 for lunch

Blistered Cabbage & Apples

Yay, fall. This dish makes a satisfying lunch “salad” or dinner side dish, and just screams fall to me. And it’s quick – plus easy. A big win in every category.

Vegetarian, gluten-free, paleo

_DS35455w

Blistered Cabbage & Apples

1 small head cabbage (about 2c. when shredded)
1 Fuji apple
2 Tbsp. ghee
1 tsp. apple cider vinegar
2 pinches kosher salt
Few grinds steakhouse seasoning
1 tsp caraway seeds

Wash, core and shred the cabbage. De-seed and chop the apple.

Heat the ghee in a large pan over medium-high heat. Add the cabbage, hit with salt and a few grinds of your favorite steakhouse seasoning and sauté, stirring occasionally, 5-10 minutes or until softened and blistered in places. You could also broil the cabbage here to the same effect.

In the last few minutes, add the apple, vinegar and another shot of salt. Stir and continue to sauté until the apples are almost tender.

Serves 1-2 for lunch or 2-3 for dinner.