There’s nothing better than coming home to a big bowl of beefy chili come winter. This slow cooker version uses root vegetables for bulk and some added umami-rich boosters for extra flavor. Whole30 compliant and delicious.
Double Beef Winter Chili
1 pound grass fed stew beef
1 pound grass fed ground beef
4 parsnips (about 1 pound)
2 carrots (about 2 cups)
4 stalks celery
1 small onion
4 cloves garlic
2 (15 ounce) cans diced fire roasted tomatoes – with or without chiles (I used Muir Glen)
2 Tbsp. Red Boat fish sauce
2 Tbsp. coconut aminos
4 Tbsp. chili powder
1 Tbsp. cumin
1 tsp. ground ginger
1 Tbsp. chipotle powder
1 tsp. cinnamon
3 big pinches Kosher salt
2 tsp. black pepper
Brown your beef(s) and add to a 6 quart crockpot when done. Chop the parsnips, carrots, onion and celery into roughly half-inch pieces and add to the pot when done. Chop the garlic and add. Add the rest of the ingredients and stir to combine, adding a can of water if your mixture looks dry.
Set on low for 8 hours and go to work. Come home and enjoy!
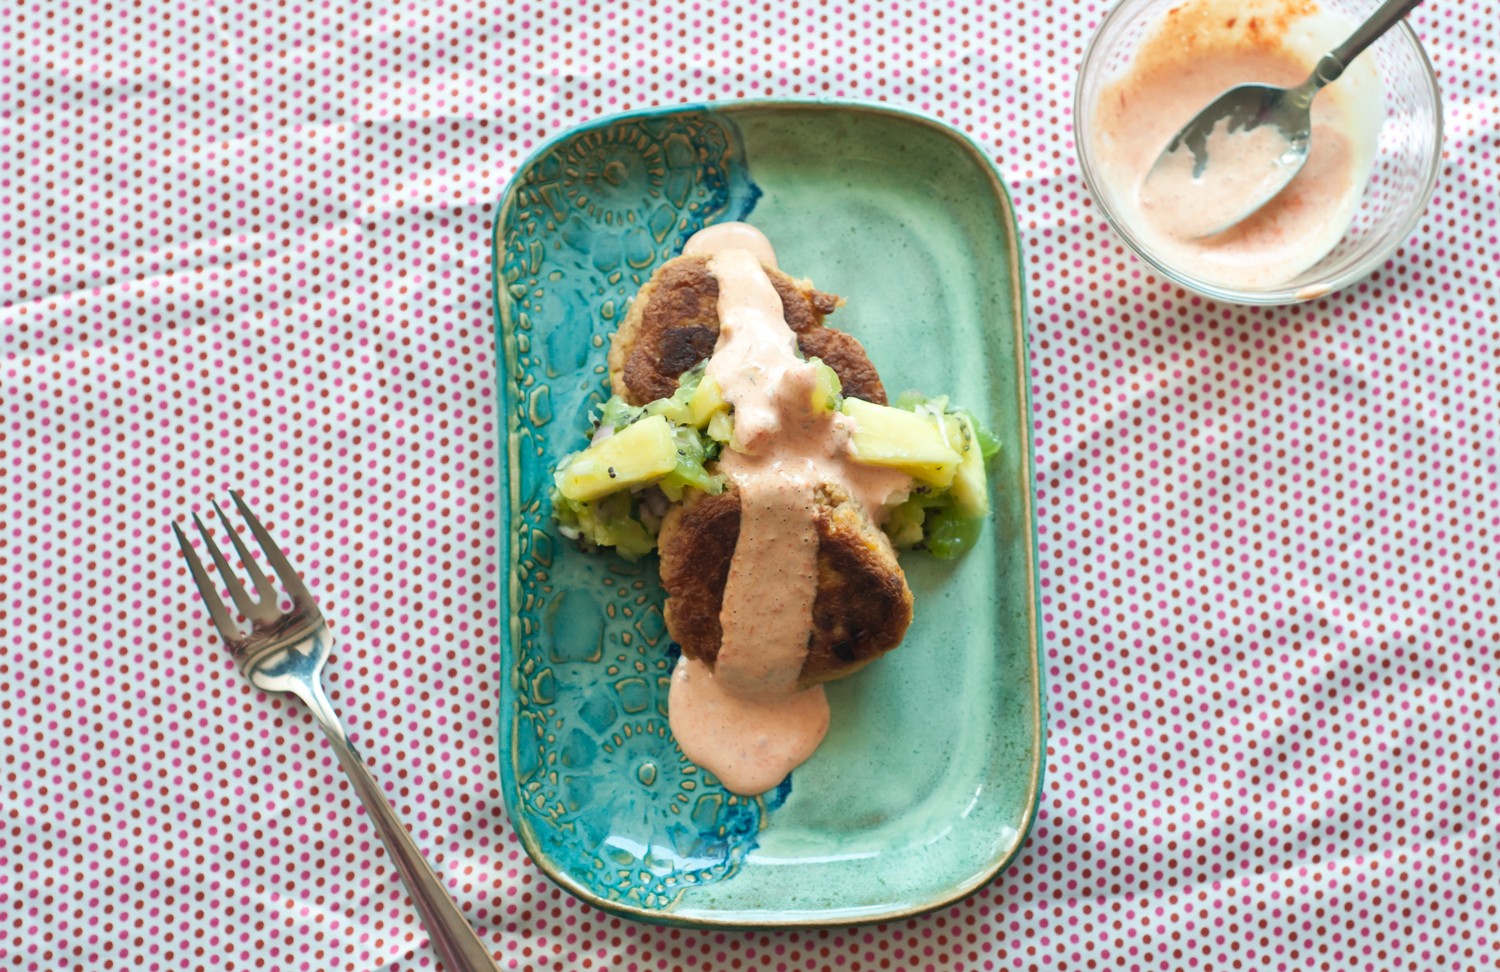
This not your momma’s polite little garden party crab cake. This crab cakes sits legs splayed in a skirt, puts its cigarette out in your sweet tea, and gives you a snarl.
A note here on making aioli. For the love of all things holy, follow the instructions. Your instructions using a whisk? Break that bad boy out. Found instructions for a Vitamix? Use that. I am aioli-retarded and can’t seem to make it – ever – to save my life. Why? Because I don’t listen. I started out this meal’s mayo sojurn with an immersion blender using a recipe written for a whisk-using over-achiever – and made a runny, kinda broken mess. I then Googled ways to fix the mess – and ended up wasting another 2 eggs in the process. I threw the whole batch out, grabbed my Vitamix, Googled Vitamix-specific instructions, and went to town. I waited until the noise of the aioli whipping around the blender changed – until it sounded like slaps instead of whirring madness – and I still thought I’d screwed something up – until I let the mayo sit and it firmed up on its own. So, take it from me: calm the crap down. Calm down and follow directions and your aioli will turn out just fine. No need to use half a bottle of grapeseed oil & over half a dozen eggs in the process.
8 ounces crab (lump or claw, canned is perfect here) 2 tsp. brown mustard (I use Gulden’s spicy) 1/4 c. paleo aioli 2 Tbsp. coconut flour 1.5 tsp. chipotle powder 1 scallion 1 tsp. sea salt 1/4 tsp. white pepper
Drain the crab and pick through for errant shells. Drop into a large bowl. Slice the scallions thinly and add to the bowl. Add the rest of the ingredients and stir to combine.
Form into patties and place on a parchment-lined plate. Chill 30 minutes to let firm up a bit.
Scoop the kiwi out of its fuzzy jacket and chop finely. Chop the pineapple finely. Dice the shallot. Chop the cilantro. Dice the jalapeno. Combine all in a small bowl and store in the fridge until dinner is ready – you want this to sit about half an hour, so the flavors have a chance to mingle.
While everything else is chilling, take about a 1/4 of a cup aioli and add a teaspoon or two of Whole30 sriracha to make your sauce. Set aside in a small dish.
When it’s time to cook the patties, heat 1-2 Tbsp. coconut oil over medium heat. Add the patties and cook about 4 minutes per side, or until nicely browned.
This is one of those meals where everything went wrong – I consciously decided to swap the main meat, the grocery was out of chorizo, I didn’t have as much adobo sauce and almond flour as I thought – and yet it all came together just fine into a damn tasty little dish, and not at all as meat clogged as I had thought it would be. I was expecting heavy, greasy, and to finish feeling like I’m on meat overload – happily, that was not the case here.
Yeah, that’s a meaty little snowman head and a meaty little mitten – in May – what of it? That’s just how I roll. With the cool kids.
Mini Turkey & Sausage Spicy Meatloaves with Seared Tomato Relish
1 lb. ground turkey
1 lb. fresh sausage (the original recipe called for chorizo; I used some sort of spicy ‘mystery sausage’ from the freezer and it turned out great)
1 Tbsp. adobo sauce (from a can of chipotles – read your label!)
2 eggs
Scant 2 Tbsp. almond flour (you can omit this alltogether and things will work out just fine – the meat mix will be a little wet but all will be well. If too-wet meat freaks you out, just halve or omit the egg – ground meat in a muffin tin is very forgiving)
1 large onion
5 cloves garlic
1 Tbsp. coconut oil
2 c. cherry tomatoes
1 tsp. adobo sauce + sriracha or more adobo if you have it and you need it for spice
2 Tbsp. olive oil
1/4 c. cilantro
juice of 1 lime (maybe more)
extra lime juice + 1/4 an avocado per person for garnish
Preheat the oven to 350 F.
Dice the onion and mince the garlic. Add to a medium pan with the coconut oil and sautee until translucent and beginning to brown around the edges.
Add half the onions & garlic to a large bowl and half to the bowl of your food processor.
To the bowl (not food processor), add the ground meat + sausage slipped of its casings + egg + flour + 1 Tbsp. adobo and mix by hand until incorporated.
If you’re a normal adult human and have “regular” muffin tins, you will need 2 for this recipe. If you’re like me and only have 1 tin of mini muffin cups and a couple novelty tins for making holiday cakes, muddle through as you can. Whatever kind of loaf you’re making, fill your cups, making sure not to fill each cup up more than 3/4 of the way through or you will have a hot mess on your hands. A hot mess and overflowing grease. Yum. I made 1 tin of mini muffins + 1 tin of snowman/mitten muffins + 3 burger sized patties fried on the stovetop.
Pop those babies into the oven and set the timer for 25 minutes.
While the loaves/muffins/snowmen heads are baking, toss the tomatoes into the pan you were using for the onions and let cook until blackened in spots and beginning to pop open. Add to the food processor, along with the remaining adobo, olive oil, lime juice, and 2 big pinches of salt. Process. Taste for seasoning; adjust heat/acid/salt if necessary. At this point, if your salsa is too wet (mine was), toss back into the pan and cook some of that liquid off. Make sure to re-taste for seasoning. Add the cilantro and set aside.
When your timer goes off, check the meatloaves. You’re looking for rendered fat on the top (you won’t have a whole heck of a lot if you’re working with turkey), and done looking bottoms. If you are using metal pans, you may have a nice crust. Silicone tins aren’t really into all that mess. If things look good, you’re in the clear. I was slightly worried about doneness (and was secretly hoping for a nice crust), so I jacked the heat to 400 and blasted the loaves for an additional 5 minutes.
Serve over a bed of sliced avocado, topped with the relish and a squirt of fresh lime juice.
Makes a bunch – I’m getting 4-6 servings (3 mini muffins, 2 snow men/mittens, or 1.5 burger patties per serving). Your mileage may vary.
Craving a rich, decadent ragu, but cutting out unnecessary carbs? This is the recipe for you. This dish is luxurious and rich, comes together in about an hour, and feels like it took days to cook. It’s meaty, hearty, and paleo friendly. It even features one of my more favorite braised vegetables, that unsung hero of the kitchen, celery. Never had cooked celery? You’re missing out. Cooked celery goes all slumpy and soft, while keeping a slight fresh taste that just speaks of crisp spring days. Yum.
1 lb. celery
2 Tbsp. coconut oil
1 onion
2 oz. pancetta
15 ounce can plum tomatoes
1 lb. hot Italian sausage (4 links)
1 egg per person
2 tsp. or so butter
crushed red pepper
salt & pepper
Cut your celery on a diagonal into 3 inch pieces. Slice the onion very thin. cut the pancetta into strips or dice into cubes.
In a large pan, heat the oil on medium. Add the onion and sautee until light gold. Add the pancetta and cook until the fat becomes translucent. Add 2 links sausage, slipped out of their casings, and sautee (breaking up the sausage into bits as you go) until browned.
Once everything is nice and browned, add the tomatoes and their juice, crushing as you add to the pan. Nestle the remaining 2 sausages in the pan. Add the celery, red pepper flakes, salt and pepper and toss to coat well. Pop the lid on and knock the heat down to a steady simmer.
Simmer 15 minutes and check – I ended up cooking my dish for an hour in total to get the doneness I wanted; you may want to go less time if you want crisper celery. At an hour, the celery was nice and soft and the flavors were really well melded. Check every 15-20 minutes or so to make sure things aren’t getting too dry and to give a nice stir. If your mix does get dry, add some water or white wan to the pan. If the mix is too watery; take the lid off, raise the heat, and boil away the excess liquid.
While the ragu is simmering, fry your eggs in butter until the desired doneness – I went for runny yolks and the dish was luscious.
This dish might look like it takes a lot of pans and bother to make, but things can be simplified by cooking the mushrooms with the leeks. I left separate because I am the only mushroom-eater in the house and had a craving.
I also had leftovers for lunch the next day topped with 2 fried eggs – fabulous. The kind of fabulous that made me sad I didn’t have a larger bowl.
Spring Pea and Asparagus Quinoa with Mushrooms and Leeks
2 c. vegetable stock
1 c. quinoa
2 leeks, white and light green parts only
2 cloves garlic
1 lb. crimini mushrooms, sliced
10 oz. fresh English peas
1 shallot
1 bunch asparagus
2 Tbsp. + 2 tsp. olive oil
1 Tbsp. + 2 tsp. butter
Juice of 1/2 a lemon
2 Tbsp. chopped mint
Salt & pepper to taste
Add the quinoa and stock to a medium pan over high heat. Bring to a boil, cover, knock the heat back to a simmer and let cook 15 minutes or until curlicues open.
Slice the leeks into thin rounds and chop the garlic.
Add to a large pan with 1 Tbsp. olive oil and 1 Tbsp. butter. Sautee over medium 10 minutes or until browned. Season with salt and pepper. When the leeks are done, add to a medium bowl.
Add the mushrooms, 2 tsp. olive oil and 2 tsp. butter to a medium pan over medium heat. Sautee 15 minutes or until softened and browned. Season with salt and pepper.
Slice the shallot into thin rings and chop the asparagus into bite-sized pieces. Add to the vacant leek pan with the peas and 1 Tbsp. olive oil. sautee over medium-high until browned. Season with salt and pepper.
Add the shallot/pea/asparagus mixture to the leek bowl and toss to combine. Hit with the lemon juice and taste for seasoning. Add the mint and toss. Serve over the quinoa, topped with mushrooms.
This meal makes a decadent weeknight dinner. Since duck is so rich, two people can very comfortably split one large breast. This not only saves calories, it saves cash.
Duck with Broccolini & Tart Dressing
3 Tbsp. good aged balsamic vinegar
2 tsp. pomegranate molasses
1/2 tsp. grated ginger
1 large boneless duck breast (skin on)
1 cup grits
2 cups milk
1 cup water
1 big handful Parmesan cheese
1 bunch broccolini, chopped
2 Tbsp. olive oil
Salt
White pepper
Start the sauce
In a small sauce pot over medium low heat, combine the vinegar, molasses and ginger. When the sauce comes up to a boil and becomes syrupy, turn off the heat.
Start the grits
In a medium sauce pot over medium-high heat, combine the grits, milk and water. Whisk. Continue to whisk every few minutes until grits come up to a boil. Reduce heat to a simmer. Cook, stirring every minute or two, until grits are soft and liquid is absorbed. If mixture gets too dry, add water. When grits are done, remove from heat. Add cheese & salt & pepper to taste.
And now for the duck
While the grits are cooking, cook the duck. In a medium saucepan over medium-high heat, add 1 Tbsp. olive oil and bring up to temp. Add the duck skin-side down – season with salt & pepper and sautée until deeply browned. Flip, season, and sautée on side 2 until deeply brown. Knock the heat back and continue to cook until medium-rare. Duck feels just like beef to the touch. Remove from the pan and set aside to rest while you cook the broccolini.
Some green veg
Drain fat. Put the pan back over the heat with 1 Tbsp. olive oil. Add broccolini. Sautée 7 minutes or until tender. Season with salt and pepper.
Slice the duck and serve with grits, broccolini and pomegranate molasses sauce.
This makes a nice, satisfying weeknight meal. The punch from cutting celery gives great flavor, but if you can’t find it, regular celery will be just fine. I usually add fish sauce to this mixture, but it skipped my mind this time, and it was fine without. If you happen to have some and happen to think about, a good squirt or three would be great here. Carrot greens are not mandatory. I happened to have a ton of them slowly dying in the fridge and decided to give it a go. They were nice, but not in the least necessary.
Pork and Celery Stir Fry
1 Tbsp. sesame oil
1 lb. ground pork
1/2 red onion
1 carrot
4 cloves garlic
1 Tbsp. grated ginger
4 Tbsp. soy sauce (swap coconut aminos if you’re going strict paleo)
1 Tbsp. ketjap manis (sweet soy sauce – swap for a bit of honey or maple syrup if going strict paleo)
3 tsp. lemon juice
1 bunch cutting celery
2 tsp. rice vinegar
Handful carrot greens
Bring sesame oil up to temperature in a wok or large frying pan over high heat. Add the pork and break apart. Keep working and breaking the pork up until it starts to brown.
While you’re working periodically on the pork, thinly slice the red onion. Add to the pan, stir.
While the onion is working, chop 1 carrot and mince 4 cloves garlic. Add to pan. Stir periodically to avoid burning, 3 mins.
While that is working, chop the cutting celery.
Add grated ginger, soy sauce, ketjap manis, lemon juice and rice vinegar. Add the cutting celery, stir fry a few minutes until starting to wilt.
Meanwhile, chop the carrot greens.
Taste and add a bit more lemon or vinegar if needed. Top with carrot greens and serve over brown rice.
Did you know that you can peel pumpkin, butternut squash or any other thin-skinned winter squash with a speed peeler? Well, I didn’t until I saw one of the pumpkin pros on Food Network’s Halloween Wars do it, and man, does it make a difference. You see, I used to use a Chinese-style meat cleaver to break into my squash, and rather than dirty up a perfectly good knife to use as a peeler, I would use said cleaver to peel my squash. Now, over the years I’ve gotten pretty dexterous with that cleaver, but using a speed peel wastes way less of the tender flesh, and may even be a bit easier. Maybe. It freaks onlookers out less, too, which may or may not be a good thing, depending upon your proclivities.
You know what’s great about winter soups? They’re healthy as shit. You’re basically eating liquid vegetables here, and the dairy? I can totally handle 2/3 c. + a little fat spread out among 4 servings if it comes with an entire day’s worth of vegetables. 4 4 3 2, bitchez! (yes I’m aware there’s now some plate thingie instead of 4 4 3 2, but lessons with songs die hard)
If you don’t want to spring for a whole container of creme fraiche, Greek yogurt might make a good substitute here. Or cream cheese. Anything creamy in the dairy family would do, even sour cream. You’re going for a little zing, a little cream, a little thick. Go on, play with your food. You know you want to.
Roasty Toasty Winter Bisque
Adapted from Roasted Pumpkin Bisque from Whole Foods
5 lb. winter squash – I used a sugar pie pumpkin and butternut squash
2 yellow onions, chopped
1 Tbsp. thyme, chopped
3 Tbsp. olive oil
6 c. chicken or vegetable broth
1/2 c. white wine (whatever you have on hand that’s drinkable)
1 tsp. ground cardamom
Juice of half a lemon
Roasted squash seeds (see recipe below)
2/3 c. creme fraiche (optional)
Preheat your oven to 425 F. Toss the squash, onions, thyme & oil and spread onto baking sheets in a single layer. Salt & pepper to season, and roast 30 mins. or until tender and just starting to brown around the edges (you may want to stir once or twice to prevent burning and feel useful – if that’s you, knock yourself out. I didn’t and mine was just fine). Once the squash is done to your liking, remove from the oven.
This would be a great time to add those squash seeds to the (now vacant) oven.
Transfer squash + friends to a large pot. Add the broth, wine & cardamom and simmer 10 minutes. Blend with an immersion blender** (or however you blend soup – in batches in a blender, whatever) until smooth. Add the lemon, stir and taste. Does it need salt or pepper? Add it now. Bring your soup back up to a simmer and kill the heat. Remove from the burner and whisk in the creme fraiche. Serve with crusty bread or a nice peppery arugula salad.
Serves 4 for dinner, or 2 for dinner with 2 big lunch portions.
Roasted Squash Seeds
Take the seeds from your peeled squash from the above recipe. Clean and place in a small bowl.
Add 1 tsp. each cumin, chipotle powder, cinnamon and brown sugar. Toss with a splash of olive oil and a big pinch of salt.
Spread out on a baking sheet and bake ~5 mins. or until browned but not burnt. Be careful here. Ideally, the oven would be at 350 to bake squash seeds, but I like to live on the edge. Just babysit your seeds and they will be fine. A little blackened on the edges is tasty, too, just make sure they’re done enough (read: dry and browned) or the texture will be off.
**A note on immersion blenders: If you make soup more than once a year and/or enjoy the occasional smoothie, buy one already. You can get them on sale for under $25 almost any month of the year if you look, and they are worth it. They hardly take up any space, and if you will use it more than once a year, it is a great investment. This is a tool I broke down and finally bought this year. I thought for years that they were a: too expensive, b: too much of a unitasker and c: something I could totally live without – people lived without them for thousands of years, after all. *Horn Sound* Wrong (except for the thousands of years bit).
For the kitchen accident prone like me, this method of soup blending has become invaluable. There is zero chance of spilling mass amounts of hot liquid on yourself or for dinner to come crashing to the ground because you lack the arm strength to pour soup from a huge pot safely. Also, splatters with the immersion blender are waaaaayyy smaller than splatters with a bar blender. Just sayin’. Having one of those puppies blow up in your face because you put the soup in while it was too hot and the steam got over zealous isn’t the most fun you can have on a weeknight. Nor is leaking soup out of the bottom of your food processor.
Isn’t $25 worth peace of mind? For me it has become so. I love my stick blender. And as an added bonus, it feels “chef-y” too. So there’s that.
This dish was intended to be a showstopper. Picture it: Miami, 2011. A group of 40 seasoned foodies gathered on a sweltering late July Saturday in a Midtown penthouse with sweeping views for a potluck promising gastronomic delights. A XX-something year-old me with my Darling Dedicated Husband sous, bustling around to make sure our dish turns out right.
I’m happy to say that my two weeks of freaking out trying to make sure our dish not only fit the ‘avant garde’ theme of the potluck, but was damn tasty, paid off. The dish was a smash success and avant garde enough to wow. Go, me. I even managed to make 40 servings that were just the right size — a little cup full — so no one was completely stuffed after eating it. More on the potluck.
This recipe is not a quick cook by a long shot and the broth makes a big batch. Freeze the leftovers in quart freezer bags to pull out and thaw as necessary. Although it takes a long time to cook, this broth is totally worth it. Definitely the best broth I have ever made by far.
So nice, I just had to take another shot of that scallop
Ramen with Kickass Broth, Fresh Bacon and Mousseline “Scallop”
Don’t be afraid of the long ingredient list. This dish, while not quick, is well worth the extra effort. Makes a great showstopper for company, and the extras can be dressed up in a million different ways.
1.5 lbs. scallops
1.5 lbs. crab (I used 8 ounces claw meat and 16 ounces lump meat)
3 large egg whites
1 1/4 c. heavy cream
5 tsp. kosher salt
2 tsp. white pepper
Juice of half a lemon
2 oz. Wakame seaweed
1 1/4 gallons water (16 cups)
1 1/2 ounces dried shiitake mushrooms, ground into as fine a powder as you can get them
5 pounds chicken wings and necks
1/2 pound chicken wings
1/2 cup sake
1/2 cup mirin
1 cup usukuchi (light) soy
1/3 pound double-smoked bacon
Ramen noodles
Enough house bacon to make a nice garnish, sliced into small batons and fried
Finely diced chives (optional, for garnish)
Finely diced red jalapeños (optional, for garnish)
1.5 lbs. scallops
1.5 lbs. crab (I used 8 ounces claw meat and 16 ounces lump meat)
3 large egg whites
1 1/4 c. heavy cream
5 tsp. kosher salt
2 tsp. white pepper
Juice of half a lemon
About half an hour before you want to start making your mousseline, put the bowl of a large food processor, the blades, and another large bowl in the freezer.
Preheat your oven to 300 degrees F.
In the food processor (out of the freezer), puree the scallops and egg whites until smooth. With the motor running, add the cream, salt, pepper and lemon juice. Blend to combine.
Dump the crab into your chilled bowl, picking through the meat to ensure there are no shells.
Fold your mixture into the crab and set in the fridge to chill while you prepare the terrine.
To make a quick & dirty terrine, take two small disposable aluminum meatloaf pans and line them with enough plastic wrap to completely cover the bottom and sides and fold over the top. Wetting the
pans slightly before placing the plastic wrap will help the plastic wrap stick in the corners.
Gently fill your terrines – this recipe makes enough to just about fill two of the meatloaf pans, or one large bread pan. Fold the ends of the plastic wrap up on the top and cover with tinfoil.
Place in a large roasting pan, and add hot water halfway up the sides of the terrines to make a water bath.
Bake until a thermometer inserted in the center reads 140 degrees F.
While your mousseline is baking, prepare the terrine “lids”. Cut cardboard (I used the container from a 12 pack of pop) so it fits as snugly as you can get it in the meatloaf pans. Make sure the edges of the “lid” aren’t getting hung up on the inner lip of the terrine. Cover with tinfoil and set aside.
When your mousseline has reached 140 degrees, pull from the oven and remove from the water bath. Cool and add your terrine “lids”. Weight both (I used 2 15-ounce cans of beans for each terrine) and chill in the refrigerator overnight.
To make the “scallops”, unmold each terrine and cut into 8 equal pieces widthwise. Use either a very small round cookie cutter or a film canister with the end snipped off (I’ll give you one guess as to which method I used) to carefully punch out your scallops. This quantity makes 40-something small scallops, with enough scraps leftover to completely fill a quart freezer bag.
Kickass Broth Adapted from David Chang’s Ramen Broth 2.0 from Lucky Peach Volume 1
2 oz. Wakame seaweed
1 1/4 gallons water (16 cups)
1 1/2 ounces dried shiitake mushrooms, ground into as fine a powder as you can get them
5 pounds chicken wings and necks
Kickass Broth Seasoning Adapted from David Chang’s Tare 2.0 from Lucky Peach Volume 1
1/2 pound chicken wings
1/2 cup sake
1/2 cup mirin
1 cup usukuchi (light) soy
1/3 pound double-smoked bacon Make The Broth
Heat the water in your largest stock pot to 150 degrees F. Add the seaweed, turn off the heat, and let steep 1 hour.
Fish out the seaweed and discard. Add the chicken and bring to a simmer. Simmer 15 minutes and scrape off any chicken scum that has risen to the top. Add the mushrooms and kick the heat down until the pot is very gently simmering. You’re looking for an occasional lazy bubble to rise to the top. Simmer gently for 5 hours, checking every once in awhile to make sure you’re neither too cold or too hot.
Strain and chill. For a more refined stock, strain, chill and remove the fat that solidifies on the top.
Make The Seasoning
Preheat your oven to 250 degrees F. Place the chicken wings in an oven-safe pot or steep-sided pan that is large enough to hold them without overlapping. Roast 5 minutes just to get the fat to start rendering out.
Crank the heat to 400 degrees. Cook, flipping occasionally, until the chicken is deeply mahogany–you’re not going for burnt, but the more color on the chicken = the better the resulting taste. This process took me around 40 minutes.
Remove the chicken and deglaze with the sake, scraping the browned bits of lovely goodness off the bottom of the pan. Set the pan over medium-high heat, and add the remaining ingredients (including the chicken).
After your mixture comes to a simmer, kick the heat back until you have the barest of simmers going. You’re not looking to reduce the liquid, just infuse it. Keep at a bare simmer for an hour and a half.
Strain and chill. Skim the fat that rises to the top.
If you’re feeling really froggy, you can save that fat to use as a topper for your ramen. Conversely, if you’re feeling really rushed for time, you can skip the skimming step and all will be well.
Finish The Broth
Season the broth with seasoning sauce until it tastes perfect to you. You may need additional salt or some heat, you may not. We added all of the seasoning sauce to the whole batch of broth and the taste came out perfect. And there you have it, a whole big pot of fabulous, rich, flavorful broth.
Cook The Noodles
Cook noodles according to package directions. Rinse in cold water to stop them from clumping and divide into your serving bowls.
Assemble The Dish
Add broth to your noodles until only a small island of noodle is left peeking out. Top the small island with a mousseline scallop, garnish with fresh bacon, chopped chives and jalapeños.