I’ve mentioned to y’all that finding ingredients familiar to my life in the States where I live can be a bit hit-and-miss. This is an example. Substitutions given.
gluten-free, paleo, keto, whole30
Crayfish & Egg Scramble
2 Duck eggs – sub large or XL chicken eggs
3 oz crayfish, cooked & peeled – shrimp was what I originally wanted, crayfish was what they had
Hand full thinly sliced green onions
White pepper & salt
Sesame oil
Magic sarap – sub chicken broth granules
Prep your ingredients: slice the green onions, crack the eggs into a bowl and whisk, gather everything else and have on hand.
Over low to medium-low heat, add a little bit of sesame oil to a pan.
After the oil warms and starts to be fragrant, add the beaten eggs. Let the bottom of the eggs firm up before running your spatula through them to create soft folds.
While the eggs are still liquidy on top, add the green onions, crayfish, salt, pepper & a sprinkle of magic sarap/bouillon granules.
It’s been a minute, hasn’t it? I’ve been wholly uninspired in the kitchen lately, opting for simple meals from batch-cooked protein + veg – or relying much too heavily on grab-n-go dinners.
Hoping brain is turning a corner there.
This was a quick & tasty lunch I batch prepped on Monday and had a couple times this week. Simple, fresh tasting and quick.
gluten-free, paleo
Dilly Bacon & Eggs Potato Salad
1/2 (ish) cup roasted mixed potatoes
2 hard boiled eggs
2 slices bacon
1-2 Tbsp mayo
Generous squeeze lemon
2 Tbsp chopped dill
Add the potatoes to a bowl. Chop the bacon and add. Reheat. While that is working, chop the dill and eggs.
Add the dill & eggs to the potato mixture and stir. Add the mayo and a generous squeeze lemon and stir again to combine well.
This isn’t keto (if you want keto, check this recipe), but it is relatively low in carbs. Like my other recipe, this is just a riff on pad Thai, but it’s glorious.
gluten-free, low-carb, pescatarian
Lower Carb Pad Thai
1 package shirataki noodles
3 Tbsp brown sugar
2 Tbsp tamarind paste or pomegranate molasses
2 Tbsp fish sauce (Red Boat is gf!)
3 Tbsp lime juice
2 Tbsp soy sauce or coconut aminos
4 cloves garlic, minced
2 tsp ground ginger
1 scallion, sliced
1/4 c cilantro, chopped
2 – 3 Tbsp basil, chopped
2 eggs
Shrimp – use your heart and wallet
Red pepper flakes
Big hand peanuts
First, prep your sauce by mixing the sugar, tamarind or pomegranate, fish sauce, lime juice, soy sauce and ground ginger. Set aside.
Next, rinse your noodles and set aside.
Grab your proteins and set aside.
Mince the ginger; set aside.
Chop the scallions, cilantro and basil – set aside.
Add 1 Tbsp sesame oil to a large pan over medium-high heat.
Heat till shimmering, then add the rinsed noodles. Stir fry 1 minute.
Add the eggs. Let sit 1-2 minutes or until mostly cooked; stir into ribbons.
Add the garlic and shrimp and stir-fry until the shrimp is cooked 3/4 of the way through.
Add the sauce. Stir fry until the liquid is boiled off by at least 2/3.
Add the cilantro and basil and stir.
Top with a big hand peanuts and sprinkle with red pepper flakes.
This dish makes a nice light dinner or decent breakfast.
vegetarian, dairy-free
Dilled Breakfast Toasts
2 slices your favorite bread, toasted (I had a nice chewy rye on hand)
2 eggs
Hand full cherry tomatoes
Tablespoon snipped dill
Dairy-free chive cream cheese
Red pepper flakes
Salt & pepper
Toast the bread and fry the eggs to your liking. I wanted runny yolks and it was delicious.
Add the tomatoes to a pan over medium-high and sauté until blackened in spots and ready to pop. You can help them a bit to pop – I kinda smashed mine so they deflated and wouldn’t be dangerous to eat.
Spread a generous layer of cream cheese on the toast, top with the snipped dill and red pepper flakes and egg. Salt & pepper to taste.
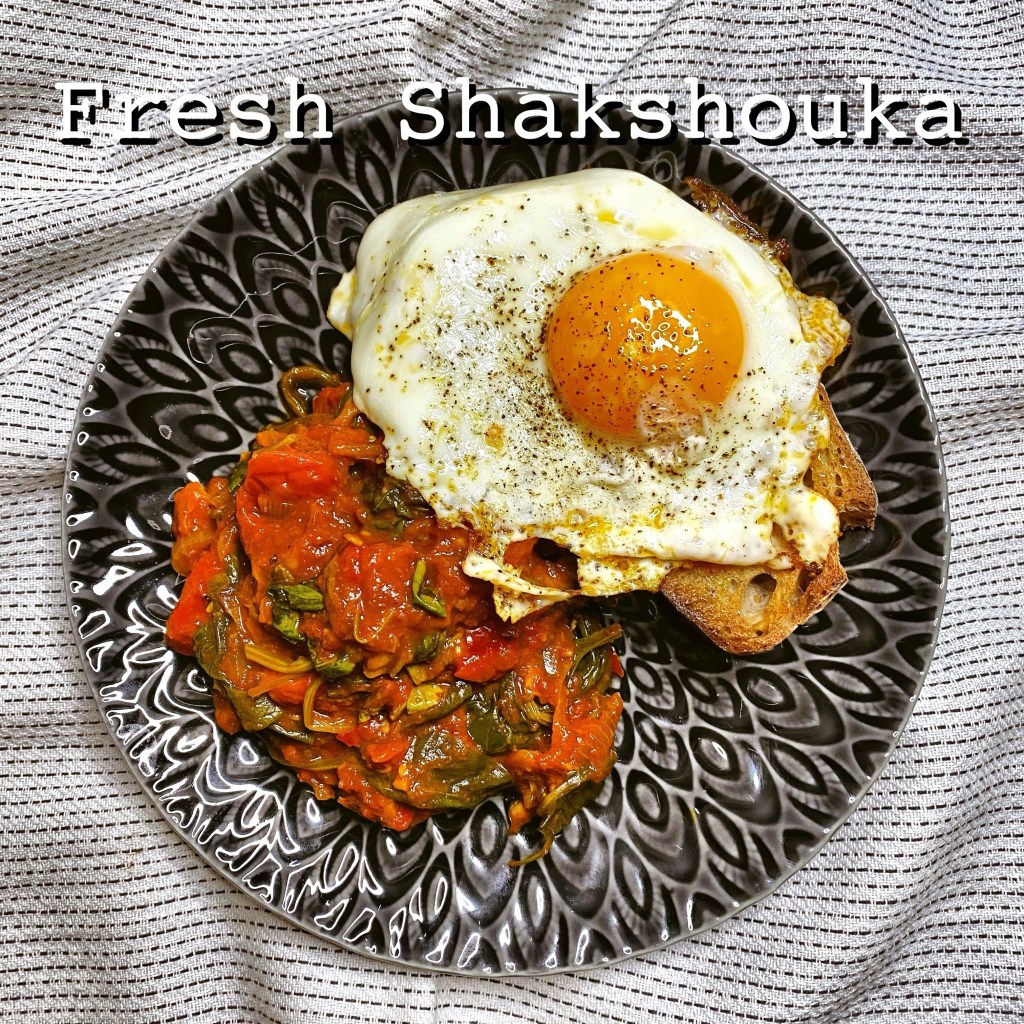
This version of shakshouka makes a great topper for crusty bread, uses a good blend of fresh + pantry ingredients – and makes a bonus second meal if you swirl some of your leftover sauce in with noodles.
It’s also DH approved, and he’s not a fan of skin-on tomatoes. He could live without the spinach, but we had greens and needed chlorophyll.
This would also be great with chickpeas for added protein and either scrambled or poached eggs/substitute cooked in the sauce. I wanted to keep my eggs separate to maximize leftovers. Scrambled soft tofu would be fantastic.
gluten-free, paleo, vegetarian, vegan, halal
Fresh Shakshouka
1 small jar fire roasted peppers in oil
2 hands cherry tomatoes
1 large onion
4 Tbsp. zaatar
1 Tbsp. smoked paprika
2 Tbsp. tomato paste
1/2 c. tinned tomatoes (I used crushed but use what you have)
3 – 4 cloves garlic – 2-3 minced and 1 or 2 whole with the end sliced off
Thinly slice the onion and sauté on medium in 1 Tbsp. of the oil that comes from the jar of peppers until soft and lightly brown in spots.
Add the sambal and 2 – 3 cloves minced garlic. Sauté a minute or two more to meld together.
While that is working, remove the peppers from the oil and roughly chop.
Add the tomatoes and peppers and sauté until the tomatoes burst.
While the tomatoes are doing their thing, roughly chop the parsley, slice the bread into thick slices and drizzle with some of the pepper oil.
Broil the bread until your desired toast level has been reached. Remove from the oven and rub with the cut end of the reserved garlic clove. Set aside.
When the tomatoes have burst (with or without a little help), add the Zaatar, smoked paprika, salt & pepper. Stir to combine and let sauté a minute or so to meld.
Add the tomato paste, canned tomatoes, and half a cup of water. Bring up to a boil, reduce the heat, add the spinach + half the parsley on top, and simmer 7 – 8 minutes. As soon as that spinach wilts and can be thoroughly mixed in is the time to add eggs if you are cooking them like a traditional Shakshouka.
If you are not, fry your eggs separately in a little of the pepper oil to your desired doneness.
Serves 2 for a light dinner + makes enough sauce to be used for another night’s pasta
I make this – or a variation on this – quite often for lunch later in the week, when I’ve got leftovers kicking around in the fridge, am out of my main protein, and still have some of this week’s spinach hanging around that is quickly going to age itself right out of my fridge.
For this version, I resisted the temptation to go Southeast Asian like usual (this dish 99.9% of the time turns out vaguely Japanese), and went Indian instead. I’m glad I broke out of my comfort zone a little and I think I’ll make this again on purpose for dinner some night.
To reheat your rice – any rice – without it drying out, add a Tablespoon or two of water, put the lid back on really loosely and zap in the microwave for :45 to 1:00. Boom. Steamed and refreshed rice.
Fry the eggs to your liking in the oil, seasoning with salt and pepper and adding a liberal sprinkle of turmeric when you flip. Add the spinach on top of that to wilt a couple seconds while the yolks finish setting to your desired doneness (I love a good runny yolk, so I separated my whites from yolks, scooted them to the side and added the spinach more to that side so I could see to yank the yolks when they were just barely set).
Grate the ginger and garlic into the rice.
Mince the chili (de-seeding if necessary) and add to the rice.
Add the eggs on top, along with a small hand of the crispy chickpeas.
It seems our Lockdown staple of ramen noodles isn’t going anywhere any time soon. DH and I are both still craving comfort, and I’m still on the war path when it comes to wasting ingredients and clearing the pantry – so we are having some mish-mashed meals as of late.
Which is all fine, provided I can continue to find ways to add at least a little nutritional value to dinner. Some sort of vegetable.
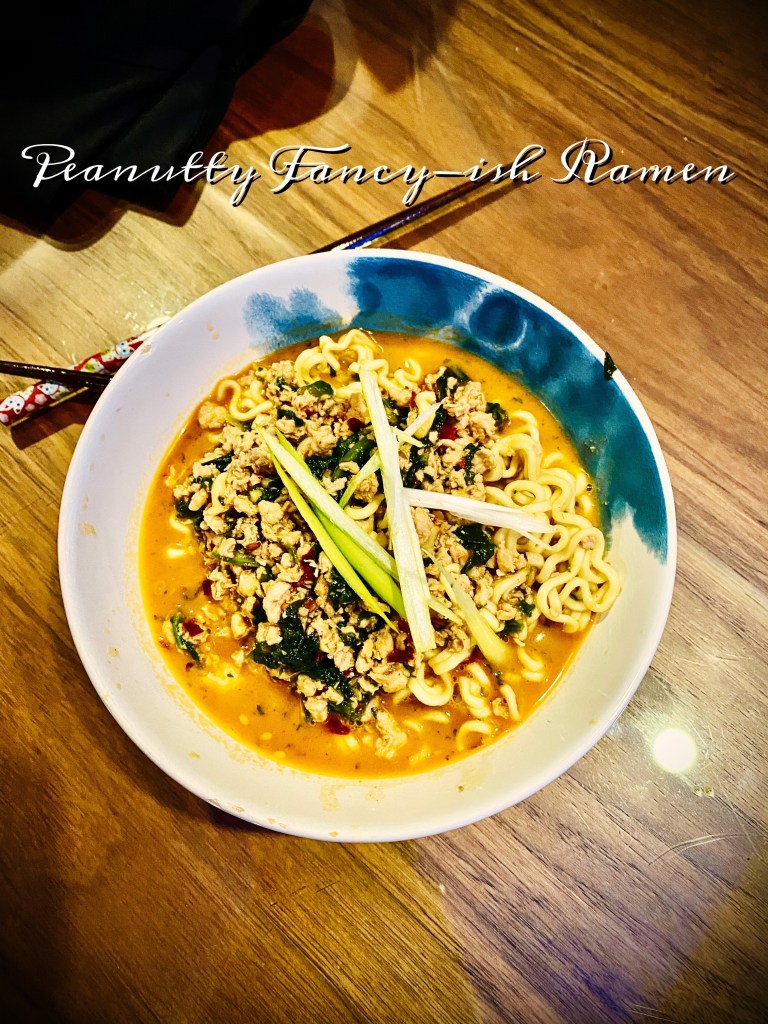
This dish elevates some pantry staples admirably, adding two sources of protein (if you add meat), and a veggie that can also serve as a freezer cleaner.
A note on ramen: I used pot noodles (aka cup o’ noodles) for this recipe. We are loving the Korean brand Budok lately – the base flavoring I went with was chicken cheese, but this would be great with pretty much any base flavor. Mushroom, chicken, chili chicken, shrimp, curry – all would be delicious.
vegetarian and vegan if you don’t add meat, gluten-free with substitutions
Peanutty Fancy-Ish Ramen
1 pot instant ramen per person (any flavor will do, or sub rice noodles for gluten free – a little chicken or veggie bouillon would add some nice flavor if you are not using the flavor packet that comes with the noodles)
2 Tbsp. peanut butter (I used a low sugar variety)
1/4 c. soy sauce, tamari or coconut aminos
1 Tbsp. sambal olek (chili garlic sauce)
2 tsp. sesame oil
1 tsp. honey (sub agave for vegan)
2 small scallions, sliced thinly
Frozen spinach
Optional: leftover ground chicken or beef, soft boiled egg, fish cakes, leftover fried tofu, or other additional protein source
Sesame seeds for garnish
Combine the peanut butter, soy sauce, sambal, sesame oil and honey in a small pot over low heat. Simmer, stirring, until well combined and beginning to thicken. If your heat is too high and this mixture dries out too much like mine did, add a Tablespoon or two of water, stir quickly to combine, and move off the heat for a second or so to cool down a bit.
While the sauce is working, add frozen spinach to the noodle pots and fill with boiling water. Let sit 3 minutes and drain.
Add the noodles to the pot with the sauce, along with scallions, any additional protein sources, and the seasoning packet. Stir well to combine and garnish with sesame seeds.
This recipe came out of a need. A need for a roast beef sandwich. Where I live, the options for lunch meat of any variety is abysmal – and roast beef is nonexistent.
I’ve been missing my favorite Boar’s Head London Porter something fierce lately, and the paltry French Dip offerings I’ve found (which are wholly not French dip sandwiches and range from sad to inedible) just aren’t cutting it.
I’m still working on my uncured sandwich beef recipe, but this onion roll was too good not to share in the meantime. It’s a Frankenstein of a few different recipes and techniques, most notably a video by Joshua Weissman, Making The Arby’s Beef ‘N Cheddar At Home | But Better.
I used his recipe for the main part, but fleshed out the technique from how I generally make bread at home. I was pleasantly surprised at how light and fluffy these were – I’m imagining because of the extra yeast than what I’m used to with my lazy person Artisan bread – and I got 9 buns out of my batch, so there were plenty of extras with which to make egg sandwiches out of. Y’all know I love a good egg recipe. Yum.
Nope, nothing – not even gluten-free or vegetarian. This may be the first time in the history of this blog I’ve ever posted a recipe that falls into zero dietary categories. Oops. Still good, though.
Caramelized Onion Rolls
Caramelized Onions:
2 yellow onions
1 Tbsp. butter – chilled is fine
2 tsp. sugar
Hefty sprinkle salt
Thinly slice the onions and add to a pan over low heat with the butter, salt and sugar. Cook, stirring frequently, until deeply brown. The browner and jammer the better. I’m poo at having the patience necessary to do this, so I always end up jacking the heat up to medium and working through half-burnt onions. Which I happen to enjoy, so you do you.
Let sit to cool. You don’t want to add hot onions to your dough.
Rolls:
3 1/4 cup flour – I used a mix of mostly white all purpose with a little wheat left in the container; he used bread flour. I’m sure bread flour is even better, but I can’t be bothered
3 Tbsp. butter, softened
1 Tbsp. instant yeast
2 tsp. sea salt
2 large eggs
1 1/4 cup lukewarm water
In a large bowl, stir the flour, yeast and salt together. Crack the eggs in, add the butter, and slowly stir in the water. Chuck in the previously caramelized onions.
When your flour is incorporated, i.e. not running around like lots of dust in the bottom of the bowl, dump onto a floured surface. He used a dough hook on a Kitchen Aid mixer and let run until … ? … I quit paying attention to that part at dough hook; I don’t have one, so I went old school.
Knead for about 10 minutes, or until the dough is just tacky to the touch. This will take a lot of dusting of your work surface to get your dough to quit sticking. That’s okay; you won’t kill the dough by doing what you need to do with it.
When your arms are dead and your dough is where you want it, add back to the bowl, cover, and let sit 2 – 3 hours in room temperature to rise.
About an hour before dinner, punch your dough down and separate into about 9 balls. I did this by pinching off about a hand full, lightly rolling in my hands to form something that looks like a roll, and placing on a silicone lined baking sheet. I ended up with 9 roughly same-sized balls.
Cover and let sit 30 – 40 minutes.
While your dough is resting, preheat the oven to 200C/375F.
*Note: If you want your buns to be shiny, brush with a little egg wash before baking. It won’t affect the taste, but they will be prettier. A little butter brush would also be a nice addition.
Bake 15 minutes or until browned but not burnt on the top and sounding hollow when you knock on the top.
This pantry-friendly fried rice is quick enough for a weeknight meal (for when the world gets back to working outside the home), and makes a great lunch the next day if there are leftovers.
Gluten-free, pescatarian
Chili Tuna Fried Rice
1.5 cups leftover cooked rice (I used sushi rice)
1/3 cup frozen shelled edamame
1/3 cup frozen cut green beans
2 Tbsp. neutral oil
2 eggs
1/4 cup coconut aminos
1 Tbsp. fish sauce
1 Tbsp. sambal olek
1 green onion, sliced
1/2 can chili tuna in oil, drained
Add your neutral oil to a large pan over high heat. When it shimmers, add the frozen veggies and green onion. Stir fry until no longer frozen and starting to look cooked.
Add the rice and tuna. Continue to stir fry until the veggies begin to brown.
Make a well in the center of the rice mixture and crack the eggs in. Let sit until the bottom is firm, then scrape up, folding into the rice mix.
Add the coconut aminos, fish sauce and sambal. Stir quickly to combine.
As you can see from my last post (see pantry clearing post #1), my pantry is all over the map – but the bulk of the ingredients center on Southeast Asia, specifically Japan.
Japanese is a cuisine my DH and I both love and both crave when we either need a little comfort (among other cuisines, tbh) but feel like we need to be a little nice to our bodies and digestive systems.
This dinner is quick, easy, and feels like a healthy hug. If raw egg yolk freaks you out, omit.
Gluten-free
Chili Tuna Rice
1 cup premade sushi rice (1/2 cup short grain rice cooked in 2 cups water + 1 Tbsp. rice vinegar, 1 Tbsp. sesame oil, and a few grinds salt)
1/2 can chili spiced tuna, drained
2 Tbsp. dried wakame
1 tsp. powder-style chicken bouillon
1/2 cup hot water
1 egg
1/2 tsp. ginger garlic paste
1 Tbsp. coconut aminos
1 tsp. butter
Generous sprinkle toasted sesame seeds
1 green onion, thinly sliced
Set the sushi rice on to cook however you cook rice. While the rice is cooking, boil the 1/2 cup water.
Add the wakame and chicken bouillon to a small bowl and add the boiling water over top. Stir to combine and let sit until the seaweed is reconstituted. Drain loosely when you’re ready to serve and add back into the bowl.
Add the butter, rice, coconut aminos, ginger garlic paste, tuna, and egg yolk. Stir well to combine.
Top with the sesame seeds and green onions and serve.