Lunch – To – Dinner Bombay Chimi

I set out to make a chimichurri-based salad, and ended up taking a trip to India instead when at the last minute I discovered my herbs had betrayed me. And it works.

Bombay chutney is a condiment used in a popular Indian street food sandwich and is kiiiiinda akin to the green mint chutney sauce served alongside a number of dishes alongside tamarind sauce. My version is a beautiful shade of emerald and has a nice spicy kick. It’s addictive, and I can’t wait to try making something akin to the actual sandwich, because I can only imagine how Bomb it would be with potato.

Like mashed potatoes. In a patty …. 🤤 But I digress.

This base recipe is great for lunch or dinner – I served it hash-style when fresh with some leftover Beyond Meat bratwurst & egg and again the next day for lunch with my favorite tuna and some bright crunch. Both ways were fantastic, but I think day 3’s lunch was actually my favorite.

gluten-free, vegetarian base, vegan base, paleo base

Lunch-To-Dinner Bombay Chimi

Base

1 head cauliflower
1 small red onion
4 cloves garlic
1/4 cup Bombay Chutney
1/4 cup neutral oil

Preheat the oven to 200C/375F and prep a baking sheet.

Break the cauliflower up into bite-sized pieces and spread out over the prepped pan. Halve and thinly slice the onion; add. Thinly slice the garlic; add.

Sprinkle liberally with salt & pepper.

In a small bowl, combine the chutney and oil. Pour over the veggies on the pan and toss well to combine, making sure to hit each piece.

Roast 25 minutes or until deeply browned.

Dinner Hash

1 leftover and cooked Beyond Meat bratwurst per person, sliced into rounds
1 – 2 eggs per person (optional)
1 handful chopped green beans
2 tsp. neutral oil
1 tsp. butter (vegan or otherwise)

In a large skillet over medium high heat, stir-fry the green beans in the oil until browned. Season with salt & pepper and add the bratwurst. Stir-fry until warmed through. Push to the side, add the butter and an egg per person to the pan. Fry until your desired doneness is reached. Serve with about 1/4 of the cauliflower per person.
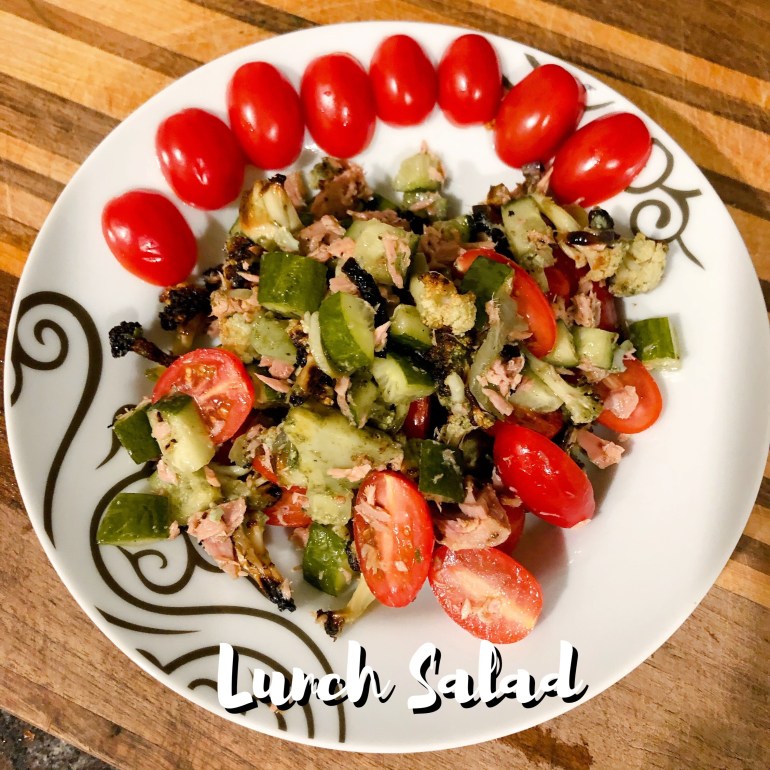
Lunch Salad

1 medium cucumber, chopped
250g cherry tomatoes, halved
1 can chili (red pepper) tuna, drained (optional)

To your leftover cauliflower, add the rest of the ingredients and toss. Warm to room temp if desired by zapping for :30/:45 or so and tossing.

Serves 2 if you’ve got half the cauliflower left; 3 if you only fed 1 the night before.

Nasi Goreng: Version 1

I just got back from a fantastic vacation spent exploring a new place – and a new food culture – and wanted to come home and continue that goodness.

Random tidbit of information: tempeh is actually from Indonesia, it’s not just an OG hippie food.

That has little to do with this recipe (though most of the dishes of Nasi Goreng I had in Bali came with sides, including some ridiculously delicious tempeh).

Nasi Goreng is one of the dishes typically associated with Indonesia (some say it’s the national dish), although it’s popular in other Southeast Asian countries as well as the Netherlands. This dish is basically just fried rice – with no singular recipe, instead typically consisting of leftovers from the previous day.

This version of the dish doesn’t taste exactly like what I had on vacation, but it’s delicious nonetheless. I feel the sauces I had in Indonesia were richer, and in subsequent versions I’ll be working toward that – but this is a great starting place.

Can be made gluten free (just sweeten some coconut aminos), paleo (swap out the rice for Cauli rice and the ketjap), pescatarian (omit the chicken), or lacto-ovo vegetarian (omit the shrimp, shrimp paste & chicken)

Nasi Goreng: Version 1

3 cups leftover cooked rice (I used short grain sushi rice)

1 shallot

4 cloves garlic

1/4 cup frozen peas

1/4 cup frozen carrots

1 bok choy

2 eggs + 1 per person

250g chicken breast

200g tiny shrimp, chopped

4 Tbsp. prepared ketchup

4 Tbsp. ketjap manis

2 Tbsp. sambal olek

2 tsp. shrimp paste

Neutral oil

Salt & pepper

Chop the chicken into small bite-sized pieces, liberally season with salt and pepper, and sautée in 1 – 2 Tbsp. neutral oil until cooked through. Remove.

While the chicken is working, mince the shallot and garlic. Chop the bok choy and separate the stems from the leaves. Defrost the frozen veggies. Assemble the rest of the ingredients. Mix the ketchup, ketjap and sambal to form a sauce. Crack 2 eggs and lightly scramble.

Fry the shallot & garlic in 1 Tbsp. neutral oil over medium-high heat in the chicken pan, making sure to scrape up any browned bits and incorporating them.

When the shallots go translucent, add the shrimp paste. Stir to combine.

Add the bok choy stems and stir-fry until beginning to soften. Add the peas, carrots and bok choy leaves. Stir fry a minute or so until combined.

Add the rice, chicken & shrimp. Stir fry a minute or so to combine.

Add the sauce, stir to combine, and push the rice to the sides of the pan to make a well in the center. Add the scrambled eggs, let sit a minute to firm up on the bottom, and stir through the rice mixture until cooked.

Serve topped with an egg that’s been fried on medium-high heat until the edges are really crispy and the yolk is just set.

Serves 4 – 6 depending upon whether you are serving with sides (popular sides include: tempeh, fried tofu, hard boiled and then deep fried eggs, green bean and cabbage salads, and shrimp chips – plus I’m sure more – this is just what I was served as sides; I’m sure every household has its own version)

Dashi Chicken & Rice

The directive for this week was simple: chicken & rice. DH said he didn’t care what nationality and what fanciness happened on top, just that he was craving chicken & rice.

IMHO, this was a bang-up week for dinners, yielding two that I can’t wait to share with you guys.

This is a quick weeknight dinner, and can be changed up easily by tossing in a handful of green leafies or something orange.

gluten-free

Dashi Chicken & Rice

1 – 1.5 lb. boneless skinless chicken (I used a mix of thighs and breasts)

1 yellow onion

2/3 cups dashi stock (I used instant granules)

2 tsp. rice wine vinegar

1 Tbsp. coconut aminos or soy sauce

1 tsp. sugar

1/2 – 1 cup cooked short grain rice per person

1 scallion

1 egg per person

2 Tbsp. neutral oil

Salt & pepper

Cut the chicken into bite-sized pieces. Add to your largest skillet, which has been brought to temperature over medium-high heat with 2 Tbsp. neutral oil added.

Sautée until white. Hit with salt & pepper.

While the chicken is working, halve and thinly slice the onion. Toss in when ready. Continue sauteeing until the onion is softened.

Add the dashi, rice vinegar, soy sauce, and sugar.

Kick the heat down to medium and sautee until the chicken is cooked through.

Portion out, leaving a single serving in the pan. Crack in an egg and whisk lightly with a chopstick.

Let cook until set, and turn out over your bowl of rice. Serve topped with a liberal sprinkle of green onion.

Indian Eggy Wrap

This recipe was inspired by the power of Instagram and has straight up become an obsession. This is half of what I’ve eaten in the last week, and I’m super bummed that I’m now out of wraps. I may just have to go to the store this afternoon for a resupply.

My version of this recipe is a blend of a Kolkata Egg Wrap posted by @playfulcooking and a good excuse to grab some of the ingredients for a Mumbai Street Sandwich posted one many forms by @saffrontrail. (Sidebar: if you love Indian food and beautiful photography, follow these ladies. They make some really inspiring dishes).

I took the eggy wrap constrict from one and just happened to run across a jar of Bombay Sandwich Sauce (a spicy mint chutney) in my local grocery, and bam. This lovely concoction that I currently can’t get enough of.

(lacto ovo) vegetarian

Indian Eggy Wrap

1 Chapati or paratha (fresh would obvs be best, but I happened to run across a whole wheat Chapati by Mission, and it wasn’t half bad) per sandwich

1-2 eggs per sandwich

A few thin slices cucumber per sandwich

A few thin strands of scallion per sandwich

2 tsp. – 1 Tbsp. Bombay Sandwich Sauce or mint chutney per sandwich

Salt & pepper

1 tsp. butter

Heat a small pan (roughly the same size as your bread) over medium heat. Add the butter and melt.

While the butter is melting, scramble the egg(s). If you are making more than 1 sandwich, make each batch separately.

Pour the egg into the pan, swirling to the edges to form a thin pancake. Season with salt and pepper and cook until solid on the bottom and still wet on top.

Nestle the chapati on top of the egg, pushing gently down to glue together.

While the egg fully cooks, slice the cucumber as thin as possible.

When the chapati starts puffing up a bit in the center, it’s time to flip. Flip carefully.

Back to finishing the cucumber and slicing the scallion thinly (I like mine lengthwise, but this is kind of a pain. You do you.).

Add a few cucumber strips and scallions down just to the side of the middle of the pancake. Drizzle your desired amount of sauce. Fold one side over to form a quesadilla-looking sandwich. Smash down with your spatula so it stays closed. Let cook another minute or so if the flipped side of the chapati doesn’t look burnt.

Best enjoyed wrapped in a paper towel to catch the sauce that will inevitably shoot out the end.

Serves 1

Vegan Cheesy Gochujang Noodles

Some days I don’t know why I get into my head the taste combinations I do. This is not one of those days. For some reason, something a couple I love on YouTube had said in a video I watched who knows how long ago popped into my head and I just couldn’t shake the desire to find out what cheese + Gochujang tasted like.

(Side note: if you like food, are interested in either Asian cuisines or finding out what it’s like to live in either Korea or Japan as a North American expat, check out Simon and Martina’s channel and blog: Eat Your Kimchi. It’s well worth the binge watch. Find them, and the recipe whose vague memory inspired this one here. Now, back to your regularly scheduled blah-blah!)

Now, I can’t do animal cheese, and I’m not even trying to pretend that this version tastes like cheese cheese (I think if I added garlic powder and mustard powder it might – but I’m still reintroducing foods, and Gochujang was my challenge food today), but it has a hint of cheesiness and a nice richness from the coconut milk.

If you’re batch cooking this recipe, maybe add a bit more coconut milk to the mix – mine turned out a bit clumped-together for subsequent meals; it loosened up on heating and stirring, but it could have been a skosh freer in the storage container.

Gluten-free, vegetarian, vegan

Vegan Cheesy Gochujang Noodles

3 Tbsp. gochujang
1/4 c. sesame oil
1/4 c. soy sauce or coconut aminos
1/4 c. nutritional yeast
1.5 in. grated ginger
1/4 c. coconut milk
Garlic oil
Bok choy, chopped
Rice noodles
Green onions
Sesame seeds
Ketjap manis

First, boil some water and set your rice noodles to soak – I do 1/2 – 1 cup per serving.

While the noodles are soaking, chop the bok choy and sautée in a large skillet over medium-high in a few squirts garlic oil. Season with a little sprinkle soy sauce/coconut aminos to season.

While those are both going, whiz together the ingredients from coconut milk up to make a sauce.

Slice the green onions and set aside for garnish. If you’re not vegan, prep your protein too (egg, little shrimps and rotisserie chicken all go great here). Grab your sesame seeds.

When the bok choy is cooked to your liking, drain the noodles and add to the pan. Stir with tongs to break them apart gently and fully incorporate the veggies. Add the sauce and stir again. Cook everything together a few minutes.

Top with the green onions, a generous sprinkle of sesame seeds, optional protein, and a swirl of ketjap manis.

The sauce makes enough to support 2.5 big servings

Korean Coconut Buddha Bowl

I’ve been quite excited to see a resurgence of bowl-related meals in the popular press (mostly because that’s what I’ve mainly been making for dinner since .. Miami) – Call them Buddha Bowls, Nutri Bowls, Glow Bowls … they all amount to the same basic formula: filling item, accents, protein source & sauce.

This version starts with a coconut curry, and wanders into the territory of Korea with the substitution of gochujang for red curry paste. Yum.

gluten-free, low carb

Korean Coconut Buddha Bowl

For the sauce

1 Tbsp. neutral oil
2 medium shallots
1 inch ginger
2 Tbsp. gochujang
1 can coconut milk
2 tsp. honey
1 Tbsp. sambal olek
2 Tbsp. fish sauce
2 Tbsp. soy sauce

For the bowl

1 Tbsp. neutral oil
1/2 onion
1 c. snap or snow peas
1 c. carrot batons
1 c. asparagus
2 c. shredded purple cabbage
2 Tbsp. soy sauce
1-2 Tbsp. lime juice
1/4 c. water

Optional: ground chicken & fried eggs

Sesame seeds

Mince the shallot & ginger and sautée in the oil until softened. Add the rest of the ingredients, whisk to combine, and let simmer 15 minutes or until thickened and velvety.

While that’s working, prep your bowl.

When your sauce is done, set aside, wipe your pan and add the oil + carrots. Stir. Add the onion and sautée until the onions are softened.

Add the peas and sautée, stirring frequently, until the peas are beginning to soften.

Add the cabbage and stir. Add 1/4 c. water and cook, stirring frequently, until the water has evaporated and the cabbage is crisp-tender.

Add the asparagus, soy sauce & lime juice and cook, stirring, a few minutes more.

Divide veggies between two bowls and top with ground chicken & fried egg if desired. Spoon over about a quarter to a third of the sauce per bowl. Sprinkle sesame seeds over top.

If you are after a shot for the ‘gram, cook all these veggies separately and arrange artfully. Ain’t nobody in this house got time for that.

Bowls serve 2 with leftover sauce

Low Carb Gochujang Shrimp Bowl

What to do with leftover shrimp, and the massive tub of gochujang I’ve acquired? Make a yummy, yummy “noodle” bowl to kill that ramen craving I was also having.

If you’re nervous about gochujang and Korean food in general, don’t be – the paste I have may look spicy, but it’s not. It’s delicious, and is useful in a bunch of different ways.

gluten-free, low carb

Low Carb Gochujang Shrimp Bowl

14-16 shrimp
1-2 scallions
A bunch of shredded cabbage (I had about 1.5/2 cups per serving)
1-2 eggs per serving
Sesame oil
Soy sauce
Sesame seeds
Salt & pepper

for the marinade

2 tsp. olive oil
2 cloves garlic, minced
1 tsp. lemon juice
2 tsp. Gochujang (I could have done with a full Tablespoon here happily)
1/2 tsp. honey
1 Tbsp. water

First, whisk together all marinade ingredients in a small bowl. Add the shrimp, toss, and let marinate :30 to a couple hours in the fridge.

While that’s working, shred your cabbage and prep all other ingredients.

Cook in batches for each serving.

First, fry the cabbage in 1 Tbsp. oil over medium-high heat until beginning to brown and soften. Season with salt & pepper.

Push to the outside of the pan and add the shrimp + a hand full of scallion to the middle and cook until 3/4 done.

Stir all together and push to the outside of the pan. Add 1 tsp. sesame oil in the center and crack the 2 eggs in. Season with a sprinkle of soy sauce.

When the egg whites have turned white, poke the yolks and stir into ribbons.

When 3/4 of the way cooked through, stir into the rest.

Transfer to a bowl and top with a sprinkle of raw scallion + sesame seeds.

Repeat with subsequent batches.

Serves 1-2 for dinner, depending on whether you have other banchan

Yogurt Leeks & Eggs

I *think* I remember seeing a dish along these lines in the pages of one of Ottolenghi’s cookbooks – or somewhere on a Lebanese menu, and I got a craving.

Plus, I found leeks at the local grocery – Whoo hoo!

Gluten-free, paleo, (lacto ovo) vegetarian, keto

Yogurt Leeks & Eggs

4 oz. sliced button mushrooms
2 leeks
1-2 Tbsp. ghee
2 eggs per person
1 Tbsp. dried oregano
1 Tbsp. garlic powder
2 tsp. ground cumin
2 tsp. your favorite curry powder
Salt & pepper
Hand full fresh herbs (I had parsley & chives)
Yogurt (I used non-dairy)
Lemon powder (or sumac)

Chop your mushrooms, wash your leeks and slice into thin moons, chop your herbs.

In a large pan, heat the ghee over medium – medium-high heat. Add the mushrooms and sautée 3-5 minutes or until no longer dry and starting to soften. Salt & pepper.

Add the leeks and spices, stir, and sautée 15-20 minutes or until the desired doneness is reached. Top with the fresh herbs, taste for seasoning, and give one last stir.

Make a well in the leeks for each egg, crack the eggs into the depressions, salt & pepper, cover and cook until the eggs are to your liking.

Serve each portion with a Tablespoon or two of yogurt and 1/2 teaspoon lemon powder for garnish.

Serves 2 for lunch

Curried Cabbage with Eggs

I was not sure this dish was going to turn out how I’d planned it to. I’m still on a Sri Lankan / curry kick, wanted to make some noodly cabbage, and thought I remembered seeing eggs with cabbage somewhere on the Internets or on a menu. Maybe. I’m glad I took a chance. This turned out fabulous.

Gluten-free, paleo, keto, vegetarian

Curried Cabbage with Eggs

1/2 small head cabbage (about 3 cups when cut into thin ribbons)
1 Tbsp. ginger garlic paste
1/2 red onion (about 1/2 cup diced)
1 Tbsp. madras curry
Pinch turmeric
1/2 tsp. chili flakes
2 – 3 Tbsp. fat of choice (I used ghee)
Juice of 1/2 lime

Cut your cabbage into ribbons and dice the onion.

Heat 2 Tbsp. fat in a large pan over medium. Add the cabbage, salt, and sautee until slightly browned – about 5 – 7 minutes.

When the cabbage is browned, push to the side and add the remaining Tablespoon fat, onion, curry powder, ginger garlic paste, turmeric and a bit more salt. Stir together and let go 1 – 2 minutes.

Stir into the cabbage and cook an additional 4 or 5 minutes or until the onions are soft and the cabbage is to your liking.

Take off the heat, sprinkle with the chili and stir. Toss with a couple cranks salt and the lime juice.

Place in a bowl and set aside while you make your eggs.

For The Eggs

2 eggs
1 Tbsp. fat of choice (I used ghee)
1 tsp. ginger garlic paste
1/2 tsp. yellow mustard seeds
1/2 tsp. turmeric
1 tsp. madras curry

Put the pan over medium-low heat. Add the fat, ginger garlic paste, mustard seeds, turmeric and curry and cook 1 – 2 minutes or until bloomed (fragrant).

Break the eggs into the pan and softly scramble until almost dry. Cut the heat.

Add on top of the cabbage and serve.

Makes 1 dinner sized serving or can stretch for 2 for lunch

Vegan Not-Yo Cheese Breakfast Bowl

HaHaHaHa. I crack myself up. Nacho cheese … not. yo. cheese. … I’m way too easily amused.

This past weekend, the DH was out of town and I was craving Taco Bell. Luckily for my stomach, Taco Bell is inordinately hard to get to from the comfort of my couch (srsly, I only know where 1 Taco Bell is in the city, and I was in zero mood to travel 1:15 and deal with whatever weekend train shenanigans NYC wanted to throw at me just for a meal that was bound to make me sick afterward), so I stayed in and scrounged what I had.

Lucky for me, that included cauliflower and cashews.

gluten-free, paleo, vegetarian, vegan, keto


Vegan Not-Yo Cheese Breakfast Bowl

1 cup raw cashews
1 cup water
1/2 – 1 cup almond milk
1/2 onion, diced
2 cloves garlic, chopped
2 Tablespoons fat of choice (I used ghee and coconut oil; you do you)
1/2 teaspoon cumin
1 teaspoon paprika
1.5 – 3 Tablespoons garlic powder
4 – 5 Tablespoons nutritional yeast
2 – 3 Tablespoons ground mustard powder
1/2 teaspoon chili powder
1 Tablespoon apple cider vinegar
Juice 1 – 2 lemons
1 chipotle chile in adobo, chopped
Salt & black pepper

First, put your cashews into a large glass measuring cup with 1 cup of water. Microwave on high or heat in a pan on the stove until boiling. You could also soak the cashews overnight like you’re “supposed” to, but I had zero forethought or capacity for patience, so I went the lazy route. Lazy ftw.

When your cashews are done, blitz in your blender with the almond milk.

A quick note here about consistency: I first tried blitzing in the food processor, but my cheese was starting off way too chunky and I was disturbed. I switched to my Vitamix, blended the shit out of the nuts, and life was much better. If you do not have a high-powered outboard motor of a blender, you may want to run your cheese through a strainer after completed.

Dice and add your onion and garlic to a smallish pan with your fat of choice. Sautee over medium until the onions are translucent.

While you are waiting, grab all your spices and a spoon – you’ll be tasting things and adding ingredients quickly.

When your alliums are translucent, add the cashew mixture, along with the cumin, paprika, half the garlic powder, half the mustard powder, half the nutritional yeast, the chili powder, the apple cider vinegar, half the lemon juice, and 1/4 cup almond milk. Whisk or stir aggressively to combine.

Add a big pinch of salt and some pepper. Stir and taste. Add more salt, pepper, garlic powder, mustard powder, nutritional yeast, lemon juice and almond milk until your desired consistency and taste is achieved.

Some taste notes: Mustard powder, garlic powder, nutritional yeast and acid are what makes the “cheese” taste here. Err on the side of aggressive seasoning.

When you have what you want taste and consistency-wise, drop the cheese in your blender and whiz to make smooth.

To make the pictured breakfast bowl, pour over some roasted cauliflower (I roasted mine in grass fed buffalo ghee with turmeric, which is why it looks weird) and top with a couple fried eggs. Or whatever vegans eat instead of eggs.

Also great over roasted brussels sprouts with taco-seasoned ground beef and scallions.